
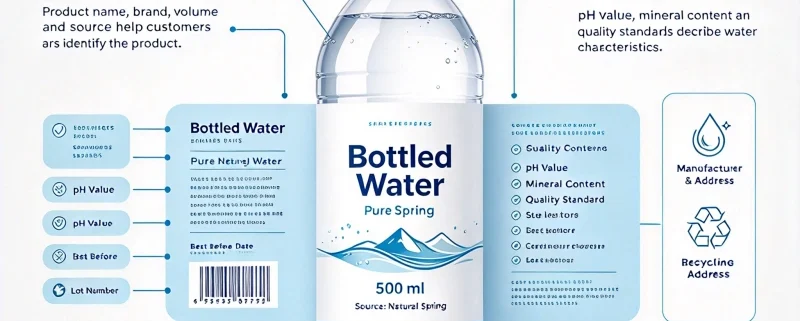
How to Make Water Bottle Labels
Learning how to make water bottle labels sounds simple until the finished bottle goes into a refrigerator or ice bucket.
A label may look perfect when it comes off the printer, but cold water bottles create condensation, wet hands increase friction, and the wrong adhesive can cause the edges to lift. For commercial products, additional concerns include bottle dimensions, print quality, application speed, barcode readability, packaging regulations, and production cost.
The good news is that the process is straightforward when you work from the bottle outward.
This guide explains how to make water bottle labels for parties, weddings, events, restaurants, hotels, promotional campaigns, private-label water brands, and commercial bottled-water production.
It covers the complete process:
Bottle measurement → label size → material selection → artwork → printing → finishing → sample testing → application → quality control → bulk production
What Do You Need to Make Water Bottle Labels?
Before opening Canva, Illustrator, Photoshop or another design program, prepare the physical bottle and determine how the label will be used.
You normally need:
- The actual water bottle
- Bottle diameter or circumference
- Usable label height
- Label material
- Adhesive
- Label artwork
- Printer or professional printing supplier
- Cutting or die-cutting method
- Application method
- Packaging and storage information
For a small event, you might only need a home printer and printable waterproof film.
For commercial production, the construction becomes more sophisticated:
Facestock + ink + protective coating/lamination + adhesive + liner
A typical pressure-sensitive label therefore has several functional layers, not just a printed piece of paper.
The most important principle is:
Choose the label according to what happens to the bottle after labeling, not just how the label looks when it comes out of the printer.
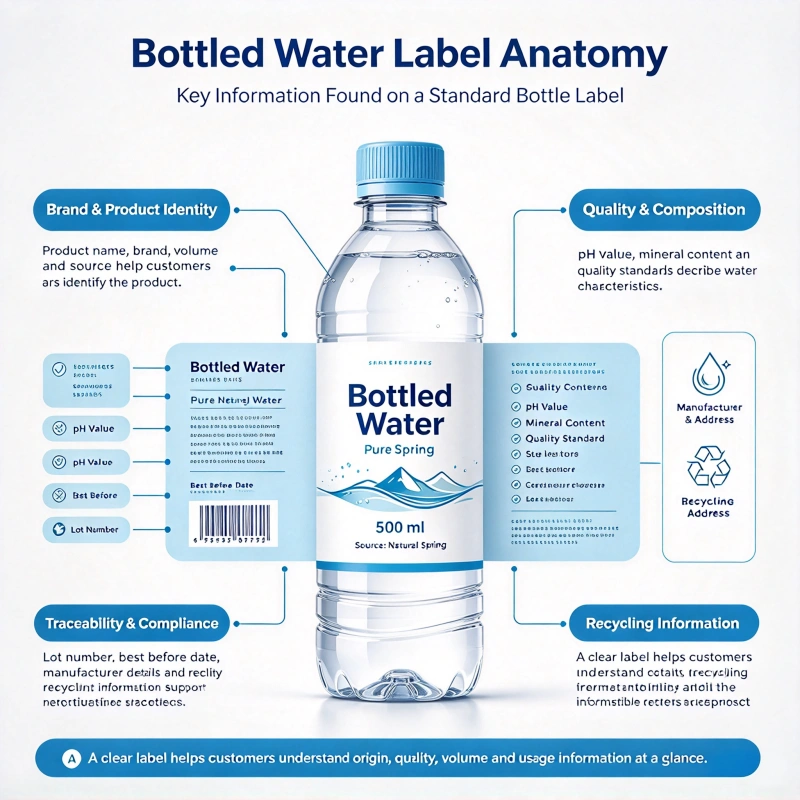
Step 1: Measure the Water Bottle Before Designing
The bottle determines the label dimensions.
This is where many beginners make their first mistake.
Do not download a generic “water bottle label size” and assume it will fit your bottle.
Even bottles with the same capacity can have different:
- Diameters
- Heights
- Shoulder shapes
- Tapers
- Curves
- Label panels
- Surface textures
Measure the circumference
The easiest method is to wrap a narrow strip of paper around the bottle.
Mark where the strip meets itself, remove it and measure the length.
This gives you a practical circumference measurement.
For a wrap-around label, you then need to determine whether you want:
- A small gap
- Edge-to-edge contact
- A slight overlap
For event labels, a small overlap is often practical because it makes application easier.
Some current bottle-label design guidance uses about 6–10 mm of overlap for simple wrap-around event labels, but treat this as a starting point rather than a universal specification. The actual requirement depends on the bottle diameter, label material and application method.
Measure the usable height
Do not measure the entire bottle height.
Measure only the relatively straight section where the label will sit.
If the label extends too far into the shoulder or bottom curve, you may see:
- Wrinkles
- Edge lifting
- Creasing
- Uneven application
- Poor label alignment
A practical approach is to leave a small safety margin from the curved areas rather than using every available millimeter.
Step 2: Decide What Type of Water Bottle Label You Need
Before selecting materials, decide what the label is actually for.
Personal event labels
Common for:
- Weddings
- Birthday parties
- Baby showers
- Corporate events
- Conferences
- School events
- Sports events
These labels usually prioritize appearance and easy installation.
Promotional water bottle labels
Used by:
- Hotels
- Restaurants
- Gyms
- Real estate companies
- Schools
- Brands
- Marketing agencies
The label needs stronger branding and consistent print quality.
Private-label bottled water
This is a commercial application.
The requirements become much stricter because the labels may need to survive:
- Refrigeration
- Transportation
- Condensation
- Repeated handling
- Automated labeling
- Distribution and retail display
Premium bottled water
Premium brands may use:
- Clear labels
- Metallic effects
- Textured materials
- Embossing
- Foil stamping
- Minimalist artwork
The material becomes part of the brand identity.
Step 3: Choose the Right Water Bottle Label Material
This is probably the most important decision in the entire process.
Can you use ordinary paper?
Technically, yes, if the bottle stays dry and you only need the label for a short time.
But ordinary paper is a poor choice for chilled bottled water.
Why?
Because water bottles commonly develop condensation when they move from a cold environment into warmer air. Paper absorbs moisture, which can lead to:
- Wrinkling
- Softening
- Edge curling
- Ink damage
- Adhesive failure
Recent industry guidance specifically recommends waterproof film materials such as BOPP, PET or vinyl for water bottle applications exposed to condensation.
BOPP water bottle labels
BOPP means biaxially oriented polypropylene.
It is one of the most practical materials for commercial water bottle labels because it is:
- Waterproof
- Lightweight
- Flexible
- Dimensionally stable
- Resistant to tearing
- Available in white and clear versions
A current BOPP technical guide lists common label-film thicknesses in roughly the 15–50 μm range, depending on the construction and grade.
For many standard bottled-water applications, white BOPP provides a good combination of:
Printability + waterproof performance + flexibility + cost control.
Clear BOPP
Clear BOPP is useful when you want a “no-label-look” appearance.
The transparent film keeps the bottle or water inside visually prominent.
However, you must prepare the artwork carefully.
Colors printed on clear material can appear less opaque because the bottle becomes part of the visual background.
You can use white ink beneath selected design areas when you need stronger color opacity.
PET
PET film provides another durable option.
It can be useful when you need:
- Higher dimensional stability
- Stronger durability
- Premium appearance
- Resistance to demanding handling
It is especially worth considering for unusual bottle shapes or applications that need a more robust film construction.
Vinyl
Printable vinyl is popular for DIY and short-run waterproof labels.
It can be practical for:
- Parties
- Weddings
- Small events
- Promotional samples
- Small businesses
However, commercial buyers should compare vinyl with BOPP and PET rather than assuming vinyl is automatically the best material.
Quick material comparison
| Material | Waterproof | Appearance | Cost | Best Application |
|---|---|---|---|---|
| Standard paper | No | Natural | Low | Dry, short-term use |
| Laminated paper | Better | Paper-like | Low–medium | Light moisture |
| White BOPP | Yes | Clean, professional | Medium | Commercial water bottles |
| Clear BOPP | Yes | No-label look | Medium | Premium/transparent designs |
| PET | Yes | Premium/durable | Medium–high | Demanding applications |
| Vinyl | Yes | Flexible | Medium | DIY and small batches |
The key point is that waterproof performance comes from the complete label construction, not just the face material. Adhesive, ink, coating, application surface and exposure time all matter.
Step 4: Choose the Correct Adhesive
Many buyers spend time choosing the film and almost no time choosing the adhesive.
That is a mistake.
A waterproof film with an unsuitable adhesive can still peel from the bottle.
The adhesive needs to match:
- PET bottle
- HDPE bottle
- Glass bottle
- Aluminum bottle
- Bottle temperature
- Application temperature
- Condensation
- Storage temperature
- Application speed
Why cold bottles are difficult
A cold bottle can develop condensation on its surface.
Pressure-sensitive adhesive does not bond effectively to a layer of water. Industry guidance specifically notes that condensation can weaken the bond and that labels should be applied to the driest surface possible.
This creates an important practical rule:
Waterproof label material does not mean you can apply the label to a soaking-wet bottle.
The label may survive water after bonding, but the adhesive still needs a suitable surface during application.
Permanent adhesive
Most commercial bottled-water labels use permanent adhesive.
This is appropriate when the label is intended to remain on the bottle throughout its normal distribution and use.
Removable adhesive
Removable adhesive may make sense for:
- Reusable bottles
- Promotional bottles
- Event products
- Temporary branding
- Products where consumers need to remove the label
Tell your label supplier the intended end use before choosing adhesive.
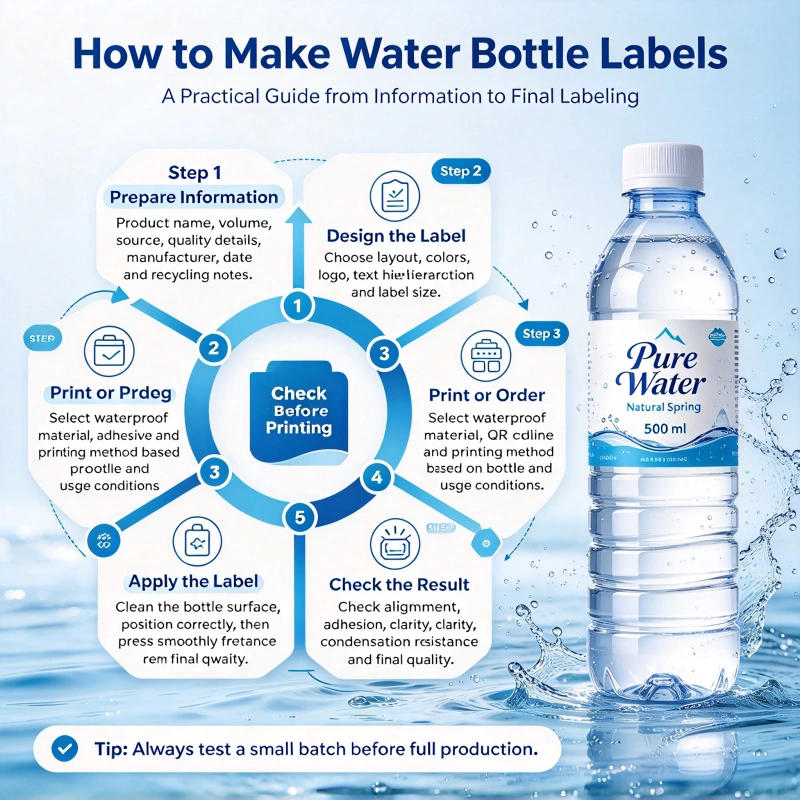
Step 5: Create the Water Bottle Label Design
Now you can start designing.
A water bottle label usually has limited space, so don’t try to put everything on the front.
A strong design usually has a clear visual hierarchy:
Brand → Product → Supporting information → Contact/QR code
For an event bottle, you might use:
Wedding Name → Date → Decorative Graphic
For a corporate bottle:
Company Logo → Event Name → Website
For a retail product:
Brand → Product Name → Required Product Information → Barcode/QR
Keep important information away from the seam
With a wrap-around label, part of the design will disappear around the back.
Do not put the most important element directly on the seam.
Keep:
- Logo
- Brand name
- Event date
- Main product name
Inside the primary visible panel.
Use high-resolution artwork
For raster images, a common production target is around 300 DPI at final size for sharp printed graphics. Vector artwork is preferable for logos, typography, and other scalable elements.
Suitable professional file formats may include:
- AI
- EPS
- SVG
- High-resolution TIFF
- High-resolution PNG where appropriate
Always confirm the printer’s preferred file format.
Step 6: Add Bleed and Safe Area
If the background extends to the edge of the label, add bleed.
For example, if the final label is:
80 × 50 mm
the artwork file may need to extend beyond the final cut line, depending on the printer’s specifications.
The safe area is equally important.
Keep important text and logos away from:
- Cutting edges
- Curved bottle areas
- Overlap areas
- Die-cut lines
Your printer should provide a production dieline if the project uses custom dimensions or complex shapes.
Step 7: Choose the Printing Method
The right printing method depends heavily on quantity and customization.
Digital printing
Digital printing is suitable for:
- Small orders
- Event labels
- Product testing
- Multiple designs
- Limited editions
- Short runs
It is particularly useful when you don’t want to commit to a large quantity.
Flexographic printing
Flexographic printing becomes attractive for larger commercial orders.
It is suitable for:
- High-volume production
- Repeated SKUs
- Consistent brand colors
- Fast production
- Roll labels
Offset printing
Offset can be useful for certain high-quality packaging projects, especially where color consistency and larger quantities justify the setup.
The practical purchasing rule
Don’t choose a printing method simply because a supplier says it is “better.”
Ask for quotes at several quantities.
For example:
| Quantity | Why Compare It |
|---|---|
| 500 | Small-batch testing |
| 1,000 | Event/small business |
| 5,000 | Growing product |
| 10,000 | Commercial run |
| 25,000 | Larger production |
| 50,000+ | High-volume manufacturing |
The most economical production method can change as volume increases.
Step 8: Choose the Finish
The finish affects both appearance and performance.
Matte
Matte labels have low reflection and a modern appearance.
Good for:
- Minimalist brands
- Corporate events
- Premium products
Gloss
Gloss creates brighter color and stronger visual impact.
Good for:
- Retail water
- Promotional bottles
- Colorful designs
Lamination
A protective laminate can help protect printed graphics from:
- Scratching
- Rubbing
- Moisture
However, don’t assume that lamination alone makes a paper label suitable for prolonged immersion. The exposed label edges and adhesive still need to survive the environment.
Spot UV
Spot UV can highlight:
- Logos
- Product names
- Decorative elements
Metallic effects
Gold and silver effects can create a premium appearance.
For water bottles, they are particularly useful for:
- Luxury events
- Premium hospitality
- Limited editions
- High-end promotional products
Step 9: Print a Physical Sample
Never skip this step for a commercial order.
A design that looks good on your monitor can behave differently on the bottle.
Check the physical sample for:
- Color
- Size
- Alignment
- Material feel
- Adhesion
- Wrinkling
- Edge lifting
- Barcode readability
- QR-code scanning
- Seam position
Then test it on the actual bottle.
Step 10: Perform the Ice-Bucket and Condensation Test
This is one of the most useful practical tests for water bottle labels.
Put the labeled bottle into:
- Refrigerator
- Cooler
- Ice bucket
Then inspect it after:
15 minutes → 30 minutes → 1 hour → several hours
Look for:
- Edge lifting
- Wrinkles
- Ink smearing
- Color changes
- Bubbles
- Adhesive failure
- Label movement
- Surface whitening
The reason this test matters is simple: the real enemy is often condensation, not a splash of water.
Recent technical guidance recommends testing the finished label on the actual container because water contact, refrigeration, condensation, and immersion are different exposure conditions.
Step 11: Apply the Label Correctly
Even the best label can fail if you apply it incorrectly.
For manual application
- Clean the bottle surface.
- Make sure it is dry.
- Align the label.
- Start from one edge.
- Apply slowly around the bottle.
- Press the label firmly.
- Remove air bubbles.
- Check the seam.
Do not rush.
For commercial application
Automatic labeling machines require additional considerations:
- Label roll direction
- Core size
- Roll outer diameter
- Label gap
- Winding direction
- Application speed
- Bottle diameter
- Label flexibility
- Adhesive tack
A label manufacturer should know these requirements before production.
Why Do Water Bottle Labels Peel Off?
There are several possible causes.
1. The bottle was wet during application
This is one of the most common problems.
If condensation exists between the bottle and adhesive, the bond can be compromised.
2. The adhesive is wrong
The adhesive may not be designed for:
- Cold surfaces
- Moisture
- PET
- Glass
- HDPE
3. The bottle surface contains contamination
Dust, oil, release agents or other contaminants can reduce adhesion.
4. The label is too stiff
Highly rigid materials may struggle to conform to small or curved bottles.
5. The bottle shape is unsuitable
A label designed for a cylindrical bottle may wrinkle on a tapered bottle.
6. Application temperature is too low
Cold can affect the initial tack of pressure-sensitive adhesives.
How to Prevent Water Bottle Labels From Peeling
A practical solution is:
Clean bottle + dry application surface + suitable adhesive + flexible material + correct application pressure + real-world testing
If you label bottles on a commercial line while wet, the process may require equipment such as air knives to remove surface moisture before label contact. Recent industry guidance specifically recommends drying the application area as much as practical because even specialized cold-and-wet adhesives have limits when surface water becomes excessive.
For most smaller operations, however, the simplest solution is:
Apply the label to a clean, dry bottle before refrigeration.
DIY Water Bottle Labels vs Professional Printing
There are two completely different approaches.
DIY printing
Best for:
- 10–100 bottles
- Weddings
- Birthday parties
- Baby showers
- Small events
- One-time promotions
Typical process:
Design → print on waterproof material → cut → apply
This gives you flexibility but requires more manual labor.
Professional printing
Better for:
- 500+ labels
- Retail products
- Private-label water
- Hotels
- Restaurants
- Corporate promotions
- Recurring orders
The manufacturer can provide:
- Roll labels
- Waterproof BOPP
- PET
- Clear film
- Professional color printing
- Die cutting
- Lamination
- Automatic-labeling specifications
- Bulk packaging
For commercial buyers, the main advantage isn’t just better printing. It is repeatability.
How Much Does It Cost to Make Water Bottle Labels?
There is no universal price because label cost depends on:
- Material
- Size
- Quantity
- Printing method
- Number of colors
- Number of SKUs
- Adhesive
- Lamination
- Die cutting
- Special finishing
- Packaging
- Shipping
A small DIY project can cost much more per label because you are buying small quantities.
Commercial production generally reduces the unit price as quantities increase, but you should compare total landed cost rather than simply asking for the cheapest label.
For B2B purchasing, request quotations at several volumes and ask the supplier to separate:
Setup cost + unit label cost + finishing + packaging + shipping
This makes supplier comparisons much more accurate.
Common Mistakes When Making Water Bottle Labels
Mistake 1: Using ordinary paper
It may look fine on the printer and fail in the refrigerator.
Better solution: use waterproof synthetic material for chilled applications.
Mistake 2: Choosing material before understanding the environment
A label for a dry event table is different from one sitting in an ice bucket.
Better solution: define the actual exposure first.
Mistake 3: Measuring the bottle incorrectly
A few millimeters can affect the final fit.
Better solution: measure the actual bottle or send a physical sample.
Mistake 4: Applying labels to wet bottles
Even good adhesive cannot perform properly through a layer of condensation.
Better solution: dry the bottle surface before application.
Mistake 5: Putting the logo over the seam
Part of the logo may disappear or look distorted.
Better solution: create a clear front panel and keep important information away from the overlap.
Mistake 6: Forgetting bottle curvature
A flat design file does not show how the label behaves around a curved bottle.
Better solution: test the physical label.
Mistake 7: Skipping the refrigerator test
A label may pass a splash test and fail after hours of condensation.
Better solution: perform a cold-storage and condensation test.
Mistake 8: Choosing waterproof material but ordinary adhesive
Waterproof film does not automatically mean waterproof adhesion.
Better solution: specify both the facestock and adhesive requirements.
Mistake 9: Ordering a huge quantity before testing
This is especially risky for a new brand.
Better solution: approve a sample or pilot run first.
A Practical Water Bottle Label Specification
If you are requesting a quotation from a label manufacturer, provide a specification like this:
| Specification | Example |
|---|---|
| Product | Custom water bottle label |
| Bottle | PET bottle |
| Bottle size | 500 ml |
| Label size | Custom based on bottle |
| Material | White BOPP |
| Adhesive | Permanent moisture-resistant |
| Printing | CMYK |
| Finish | Gloss or matte |
| Application | Manual/automatic |
| Environment | Refrigerated |
| Quantity | 10,000 pcs |
| Artwork | Print-ready PDF/AI |
| Special requirements | Barcode/QR code |
This gives the manufacturer enough information to recommend a suitable construction rather than simply quoting a generic sticker.
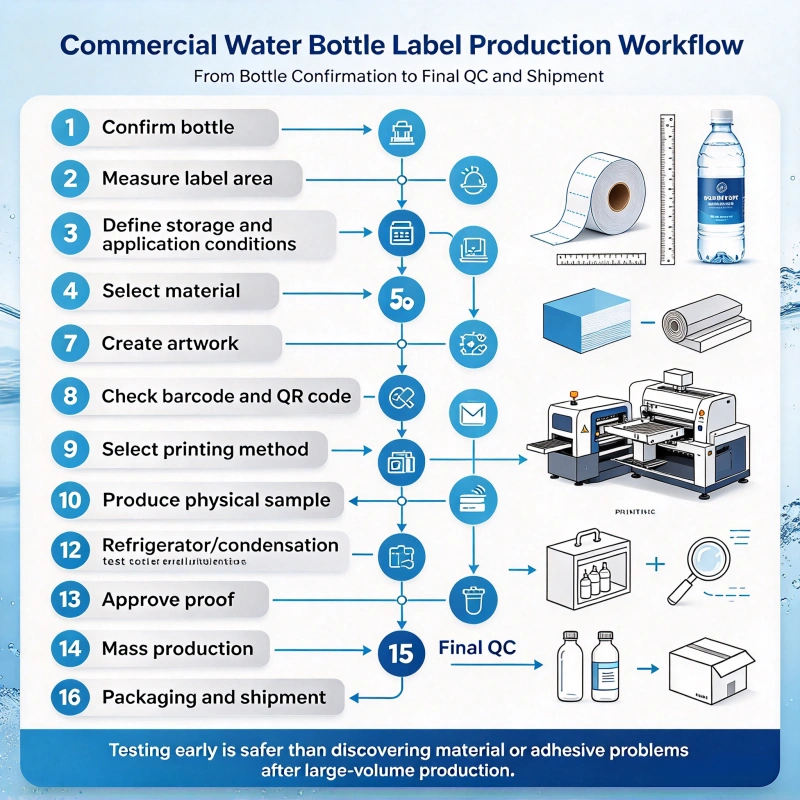
Commercial Water Bottle Label Production Workflow
For a professional project, I recommend this workflow:
1. Confirm bottle
↓
2. Measure label area
↓
3. Define storage and application conditions
↓
4. Select material
↓
5. Select adhesive
↓
6. Prepare dieline
↓
7. Create artwork
↓
8. Check barcode and QR code
↓
9. Select printing method
↓
10. Produce physical sample
↓
11. Apply to actual bottle
↓
12. Refrigerator/condensation test
↓
13. Approve proof
↓
14. Mass production
↓
15. Final QC
↓
16. Packaging and shipment
This workflow may take slightly longer at the beginning, but it is much safer than discovering a material or adhesive problem after producing tens of thousands of labels.
Water Bottle Label Quality-Control Checklist
Before accepting the finished labels, check:
- Correct dimensions
- Correct quantity
- Correct material
- Correct adhesive
- Correct artwork
- Color matches approved sample
- No printing defects
- No scratches
- Die cutting is accurate
- Barcode scans correctly
- QR code works
- Label applies smoothly
- No bubbles
- No edge lifting
- Cold test completed
- Condensation test completed
- Roll direction is correct
- Packaging is suitable for transportation
Frequently Asked Questions About Making Water Bottle Labels
What is the best material for water bottle labels?
For chilled commercial water bottles, white BOPP is one of the most practical choices because it combines waterproof performance, printability, flexibility and good durability.
Clear BOPP works well for a no-label look, while PET is a good option when you need greater durability or a premium film construction.
Can I use paper labels on water bottles?
Yes, but only when the exposure conditions allow it.
For dry, short-term applications, paper can be economical and attractive.
For refrigerated bottles, condensation and ice exposure make standard paper much more risky. Synthetic film is generally the safer choice.
How do I make waterproof water bottle labels?
Use a waterproof synthetic facestock such as BOPP, PET or suitable vinyl, combine it with an adhesive appropriate for the bottle and temperature conditions, and use a compatible ink and protective finish.
Then test the finished label under actual conditions.
What size should a water bottle label be?
There is no universal size.
First, measure the bottle circumference and usable straight-side height.
For example, some standard 16.9 oz bottles use labels around 8 × 2 inches, but treat this only as a reference; the bottle should determine the final dimensions.
How do I measure a bottle for a wrap-around label?
Wrap a flexible paper strip around the bottle, mark the meeting point, remove it and measure the strip.
Then determine whether your production design requires a gap or overlap.
Why are my water bottle labels peeling?
The most common causes are:
- Condensation during application
- Incorrect adhesive
- Contaminated bottle surface
- Low application temperature
- Excessively rigid material
- Poor application pressure
- Bottle curvature
The solution is to match the complete label construction to the actual bottle and environment.
Can I put labels on cold water bottles?
It depends on the adhesive and application system.
However, a wet, condensation-covered bottle is difficult for pressure-sensitive adhesives because the adhesive must contact the bottle surface directly.
For most small operations, applying the label to a clean, dry bottle before chilling is the safer approach.
Are BOPP water bottle labels recyclable?
BOPP is a polypropylene film, but the recyclability of the complete labeled bottle depends on the bottle polymer, adhesive, label coverage, inks, local recycling infrastructure, and packaging design.
Do not claim that a label is universally recyclable simply because the facestock itself is recyclable.
Is vinyl better than BOPP for water bottle labels?
Not automatically.
Vinyl is convenient for DIY and small-batch applications.
BOPP is widely used for commercial product labels because it offers a strong combination of moisture resistance, printability and dimensional stability.
The correct choice depends on quantity, bottle type, application method, and performance requirements.
Do water bottle labels need lamination?
Not always.
A suitable synthetic facestock and compatible printing system may already provide the required performance.
Lamination becomes useful when additional protection against abrasion, handling or environmental exposure is required.
However, the adhesive still needs to suit the bottle and conditions.
How do I make labels for a 500 ml water bottle?
Start with the actual 500 ml bottle rather than assuming every 500 ml bottle has the same dimensions.
Measure the circumference and usable label height, choose a waterproof material if the bottle will be chilled, prepare the artwork using a printer’s dieline, produce a sample, apply it to the bottle and perform a condensation test.
Can I make water bottle labels with a home printer?
Yes.
For small events, you can use printable waterproof vinyl or suitable synthetic label stock with a compatible printer.
Always confirm that the printable material is compatible with your specific inkjet or laser printer.
For commercial production, professional digital, flexographic or other industrial printing is generally more practical.
How do I make water bottle labels for a wedding?
For a wedding, keep the design simple.
Use:
- Couple’s names
- Wedding date
- Simple graphic
- Optional thank-you message
For bottles going into an ice bucket, use waterproof printable film rather than ordinary paper.
Print a small test batch first and check the labels after chilling.
How many labels should I order?
For an event, order enough for the actual number of bottles plus a reasonable reserve.
For commercial production, compare multiple quantities because the unit cost can change significantly with production volume.
Don’t order a very large quantity just to get the lowest unit price unless you are confident the design and bottle specifications will remain unchanged.
Final Takeaway
The easiest way to understand how to make water bottle labels is to stop thinking of them as ordinary stickers.
A successful water bottle label is a small packaging system.
The material must survive moisture.
The adhesive must bond to the actual bottle.
The printing must remain readable.
The size must match the bottle.
The design must account for the wrap-around seam.
And the finished label must be tested under the conditions the bottle will actually experience.
For a dry event bottle, a simple printable label may be enough.
For refrigerated commercial water, a more reliable specification is usually:
Waterproof BOPP/PET film + suitable permanent moisture-resistant adhesive + compatible printing + appropriate finish + physical condensation testing.
The most important production lesson is to test the complete label on the actual bottle before bulk production. A label that looks perfect on a computer screen hasn’t passed the real test yet. Put it on the bottle, refrigerate it, expose it to condensation, handle it with wet hands, and inspect the edges.
If it still looks good and stays firmly attached after that process, you are much closer to a label ready for real-world production.

Jgs is a custom labeling professional with 15 years of industry experience in labeling solutions.


Leave a Reply
Want to join the discussion?Feel free to contribute!