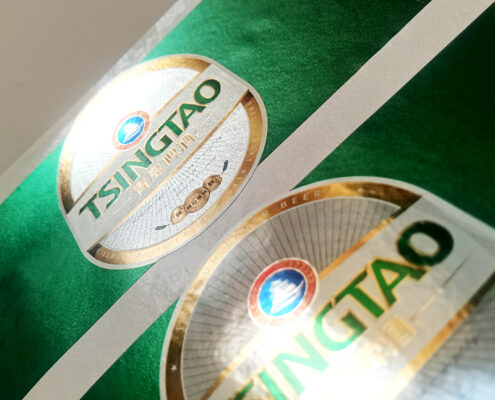
How to Make Custom Liquor Bottle Labels: A Complete Step-by-Step Guide
Custom liquor bottle labels do much more than display a logo. A good label must fit the bottle accurately, withstand handling and condensation, communicate the product clearly, meet applicable labeling requirements, and still look attractive enough to compete on a retail shelf.
Whether you are launching a craft gin, whiskey, vodka, rum, tequila, liqueur, or a private-label spirits brand, the process is easier when you treat the label as a complete packaging project rather than simply a piece of printed paper.
This guide explains how to make custom liquor bottle labels from start to finish, including bottle measurement, artwork preparation, material selection, printing, finishing, sampling, application, quality control, and common mistakes to avoid.
What Do You Need Before Making Custom Liquor Bottle Labels?
Before creating artwork, collect the bottle’s physical and commercial information.
At minimum, you should have:
| Information | Why It Matters |
|---|---|
| Bottle height | Determines available label area |
| Bottle diameter or circumference | Prevents incorrect label width |
| Bottle material | Affects adhesive selection |
| Bottle shape | Determines whether a flat or curved label is appropriate |
| Label position | Determines dimensions and artwork layout |
| Bottle capacity | May affect mandatory label information |
| Product type | Whiskey, vodka, gin, rum, liqueur, etc. |
| Alcohol content | Important for regulatory information |
| Sales market | Label requirements vary by country |
| Application method | Hand application or automatic labeling |
| Expected quantity | Influences printing technology and unit cost |
One of the most common mistakes is designing the label before confirming the actual bottle.
A label that looks perfect on a computer screen can wrinkle badly when applied to a tapered or heavily curved bottle.
For commercial production, it is much safer to send the label manufacturer an actual bottle, a bottle specification sheet, or an accurate dimensional drawing.
Step 1: Measure the Liquor Bottle
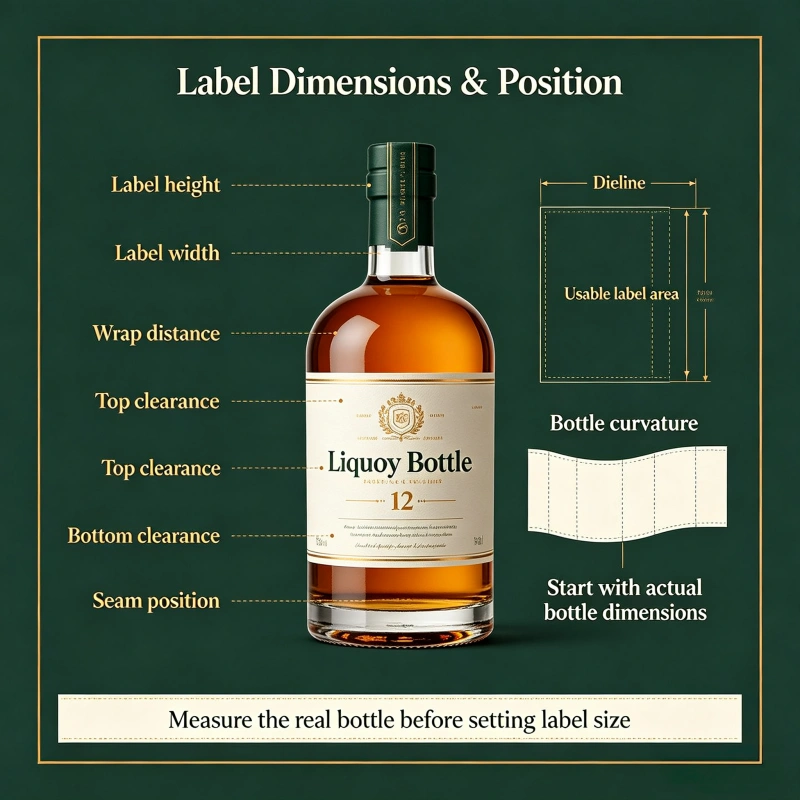
The first practical step is measuring the bottle.
You normally need to determine:
- Bottle circumference
- Straight-side height
- Available front-panel width
- Available back-panel width
- Neck circumference
- Shoulder shape
- Taper angle
- Distance between label areas
- Clearance from bottle edges and seams
For a simple cylindrical bottle, you can measure the circumference and calculate the maximum theoretical label width.
However, maximum theoretical width is not necessarily the correct production width.
For example, if the bottle circumference is 250 mm, you shouldn’t automatically order a 250 mm-wide wrap-around label. You may need a small gap, or the label may need to stop before a curved or tapered section.
For bottles with strong shoulders or tapering, a physical sample is much more useful than measurements alone.
A practical measurement method
- Clean and dry the bottle.
- Measure the circumference with a flexible measuring tape.
- Measure the straight vertical surface.
- Mark the intended label position.
- Measure the usable width and height.
- Photograph the bottle from the front and side.
- Send the measurements to your label supplier.
- Request a digital dieline before final artwork.
This prevents one of the most expensive mistakes in custom label production: printing thousands of labels that do not fit the bottle correctly.
Step 2: Decide What Information Goes on the Label
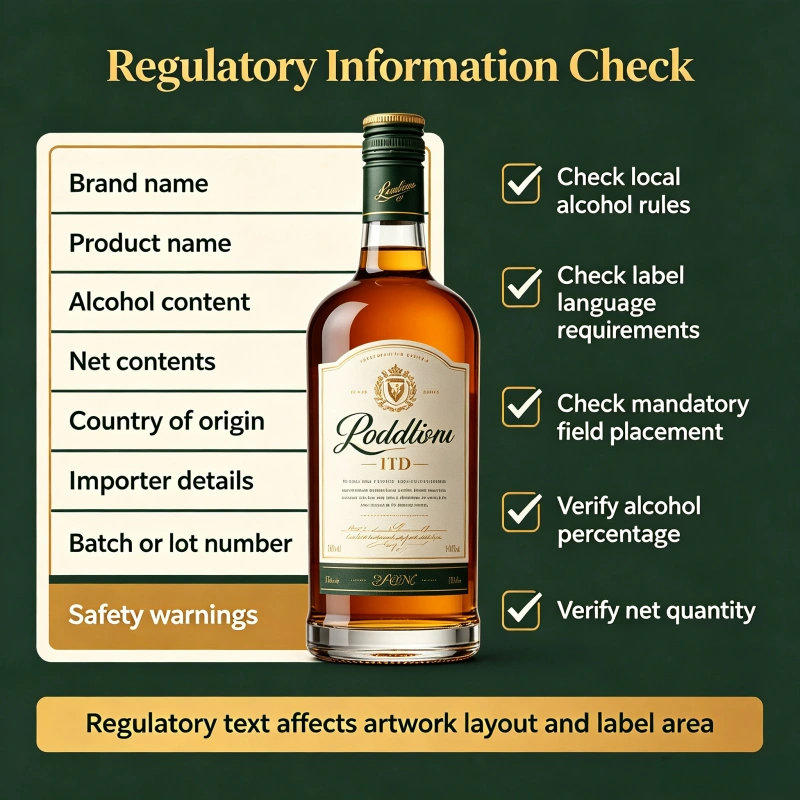
Before designing the graphics, create a content checklist.
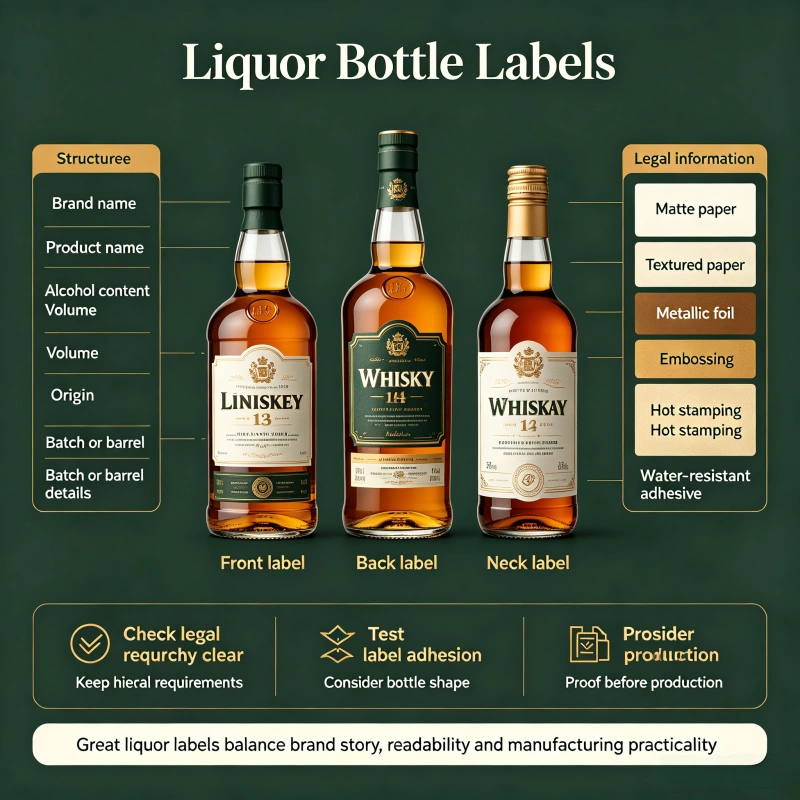
A liquor label may contain:
- Brand name
- Product name
- Spirit class or type
- Alcohol content
- Net contents
- Producer or bottler information
- Address information
- Country of origin when applicable
- Age statement when applicable
- Batch or lot information
- Barcode
- QR code
- Website
- Brand story
- Ingredients or other disclosures when applicable
- Required health warning
- Marketing claims
The exact requirements depend on the country where the product will be sold.
For example, in the United States, TTB states that distilled spirits labels generally have mandatory information including the brand name, class/type designation, alcohol content, and other applicable information such as age statement, commodity statement, health warning, name/address, net contents, and country of origin for imports.
For distilled spirits, the alcohol-content statement must appear in the same field of vision as the brand name and class/type designation. TTB also specifies minimum type sizes depending on container capacity and requires the statement to be readily legible and displayed against a contrasting background.
Therefore, don’t finalize the artwork based on aesthetics alone.
Regulatory review should happen before mass production.
Step 3: Create the Label Structure
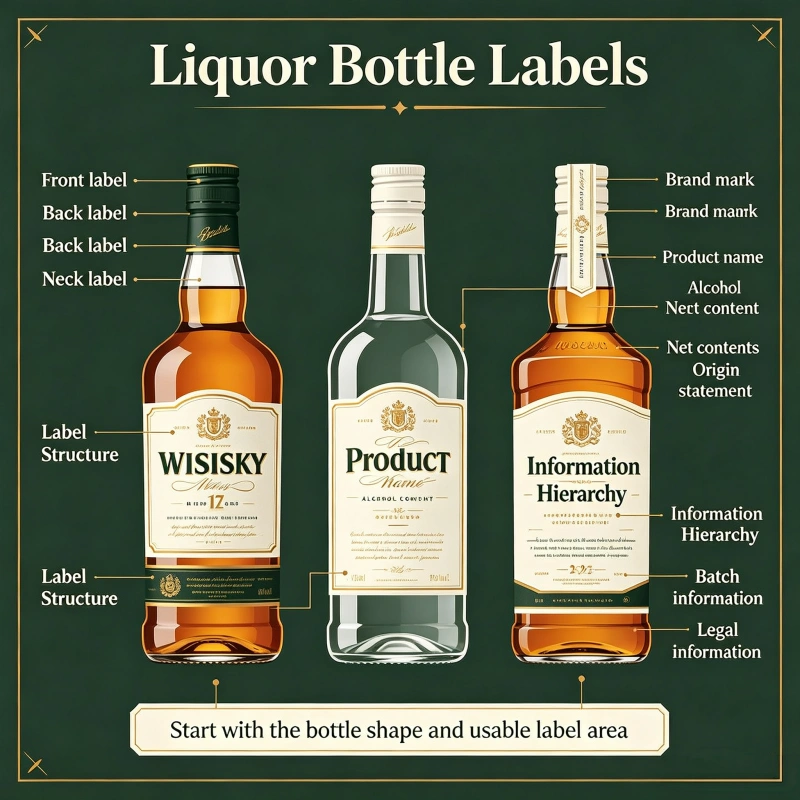
Most liquor bottles use one or more of the following:
Front label
The front label usually carries the strongest branding elements:
- Logo
- Brand name
- Spirit type
- Product name
- Alcohol content
- Net contents
- Key visual elements
The front label should communicate the product within a few seconds.
Back label
The back label provides space for:
- Product description
- Producer information
- Brand story
- Barcode
- QR code
- Required statements
- Serving suggestions
- Additional product information
Neck label
A neck label can add a premium appearance and is commonly used for:
- Limited editions
- Distillery branding
- Small-batch information
- Vintage information
- Promotional messaging
Seal or closure label
Some premium spirits also use:
- Bottle seals
- Tamper-evident labels
- Closure stickers
- Foil labels
- Capsule decorations
You can produce these elements separately or as part of a complete bottle-label program.
Step 4: Choose the Right Label Material
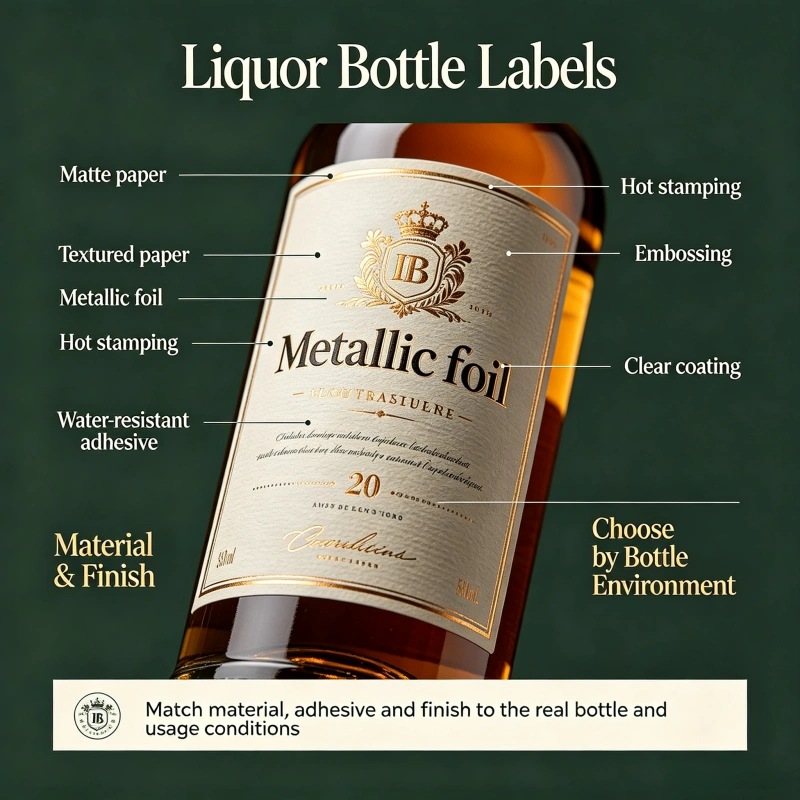
Material selection is one of the most important decisions in custom liquor bottle labels.
The same artwork can produce very different results depending on the substrate.
Paper liquor bottle labels
Paper remains popular for premium spirits because it provides a traditional, tactile appearance.
Common options include:
- Uncoated paper
- Coated paper
- Textured paper
- Cotton-style paper
- Embossed paper
- Kraft paper
- Wet-strength paper
Paper works particularly well for whiskey, craft gin, wine-style spirits and premium liqueurs where the tactile experience is part of the brand identity.
However, ordinary paper may not be the best choice for bottles exposed to ice, condensation or refrigeration.
Synthetic labels
Synthetic materials such as PP and PET can provide better resistance to:
- Moisture
- Condensation
- Handling
- Scratching
- Refrigeration
They are worth considering when the bottle will be stored in an ice bucket, refrigerator, cooler or humid environment.
Clear labels
Transparent film creates the popular “no-label-look” effect.
Instead of seeing a white rectangle around the artwork, the bottle itself becomes part of the design.
This can work especially well on clear glass bottles.
However, transparent labels require careful artwork preparation. White ink may be needed beneath selected areas of the design to make certain colors visible.
Metallic and specialty materials
For premium liquor packaging, manufacturers can also use:
- Silver film
- Gold-effect stock
- Metallic paper
- Pearlescent paper
- Holographic film
- Textured stocks
Select the material alongside the printing and finishing process, not separately.
Step 5: Choose the Adhesive
The adhesive is often overlooked until the finished labels start failing.
Your supplier should know:
- Bottle material
- Storage temperature
- Condensation level
- Humidity
- Application speed
- Hand or automatic application
- Expected shelf conditions
A label applied to a dry glass bottle in a controlled warehouse environment has different requirements from a label applied to a chilled bottle covered with condensation.
Common adhesive considerations include:
| Condition | What to Consider |
|---|---|
| Dry glass | Standard permanent adhesive may work |
| Refrigerated bottle | Cold-temperature performance |
| Condensation | Moisture-resistant adhesive |
| Humid storage | Stronger moisture resistance |
| Textured glass | Adhesive conformability |
| Automatic labeling | Consistent release and application |
| Short-term promotion | Removable or repositionable options where appropriate |
Do not select adhesive simply because it is described as “strong.”
The correct adhesive is the one that remains stable under the actual application and storage conditions.
Step 6: Design the Artwork
Once the dimensions, material and label structure are confirmed, create the artwork.
A professional label file should normally include:
- Correct final dimensions
- Bleed
- Safe area
- Dieline
- CMYK artwork where applicable
- Vector logo
- High-resolution images
- Correct fonts
- Barcode
- QR code
- White ink layer when required
- Foil or special-finishing layers where applicable
Ask the printer for the exact dieline before finalizing the design.
Why the dieline matters
A bottle label is not just a rectangle.
The printer needs to know:
- Where the label will be cut
- Where special finishes will appear
- Which areas require foil
- Which areas require embossing
- Where white ink is needed
- Which parts must remain inside the safe area
A good dieline eliminates guesswork between designer and printer.
Step 7: Select Printing Technology
Different printing methods make sense at different production volumes.
Digital printing
Digital printing is useful for:
- Small and medium runs
- Multiple SKUs
- Limited editions
- Product testing
- Variable data
- Frequent artwork changes
It generally allows brands to order smaller quantities without creating traditional printing plates.
Flexographic printing
Flexographic printing can become attractive for larger production quantities.
It is commonly used for:
- Large-volume label production
- Multiple repeat orders
- Consistent production
- High-speed manufacturing
The most economical printing method depends on order quantity, artwork complexity, number of colors, finishing requirements and repeat volume.
Do not ask a supplier only, “What is your price per label?”
Ask for a complete quotation based on your actual specifications.
Step 8: Add Premium Finishing
Finishing turns an ordinary bottle label into a premium packaging component.
Popular options include:
Hot foil stamping
Gold, silver, copper and other metallic effects can highlight:
- Logos
- Borders
- Product names
- Limited-edition information
Embossing
Embossing creates a raised tactile effect.
It works particularly well for:
- Brand logos
- Crests
- Typography
- Decorative patterns
Debossing
Debossing pushes the selected design into the label surface rather than raising it.
Spot UV
Spot UV creates a localized glossy effect.
For example, a label can have a matte background with a glossy brand logo.
Soft-touch coating
Soft-touch finishes provide a smooth tactile surface and are often used for premium packaging.
Die cutting
Custom die cutting lets the label take shapes beyond a standard rectangle.
For a premium spirits brand, the shape itself can become part of the visual identity.
Step 9: Make a Physical Sample
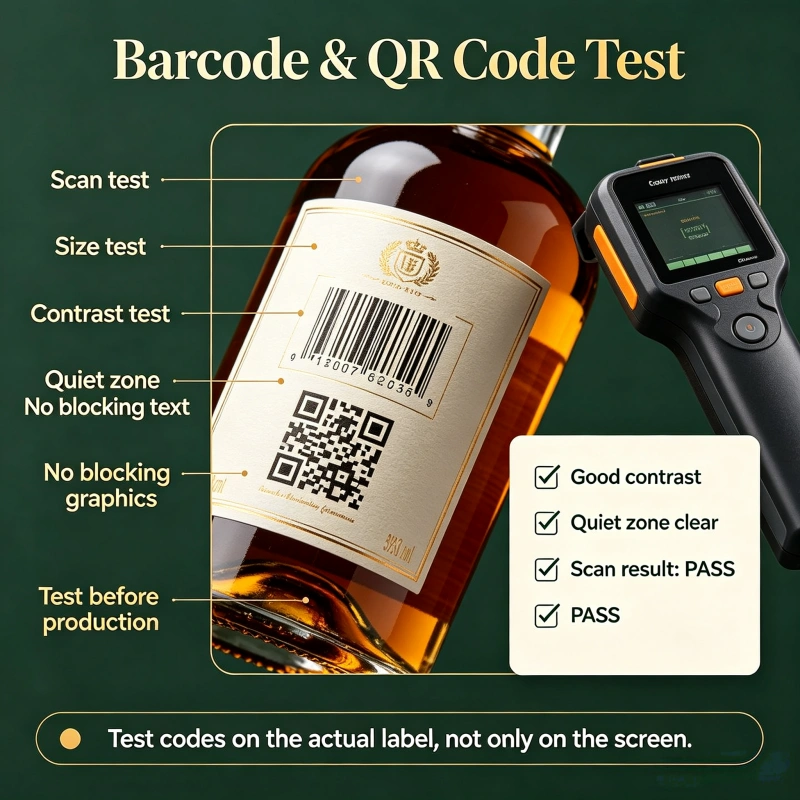
Never skip the sample stage for a new liquor bottle label.
This is one of the most important recommendations in the entire process.
A digital proof cannot show you everything.
You need to inspect:
- Actual color
- Material texture
- Adhesion
- Label dimensions
- Bottle curvature
- Foil accuracy
- Embossing depth
- Barcode readability
- QR-code scanning
- Label positioning
- Overall shelf appearance
Ideally, apply the sample to the actual bottle.
Then inspect it from:
- Front
- Side
- Back
- 45-degree angle
- Normal retail viewing distance
A label can look excellent on a flat proof but appear unbalanced once wrapped around glass.
Step 10: Test the Label Under Real Conditions
For liquor packaging, laboratory-style testing is not always necessary for every project, but practical testing is extremely valuable.
Try to reproduce the actual environment.
For example:
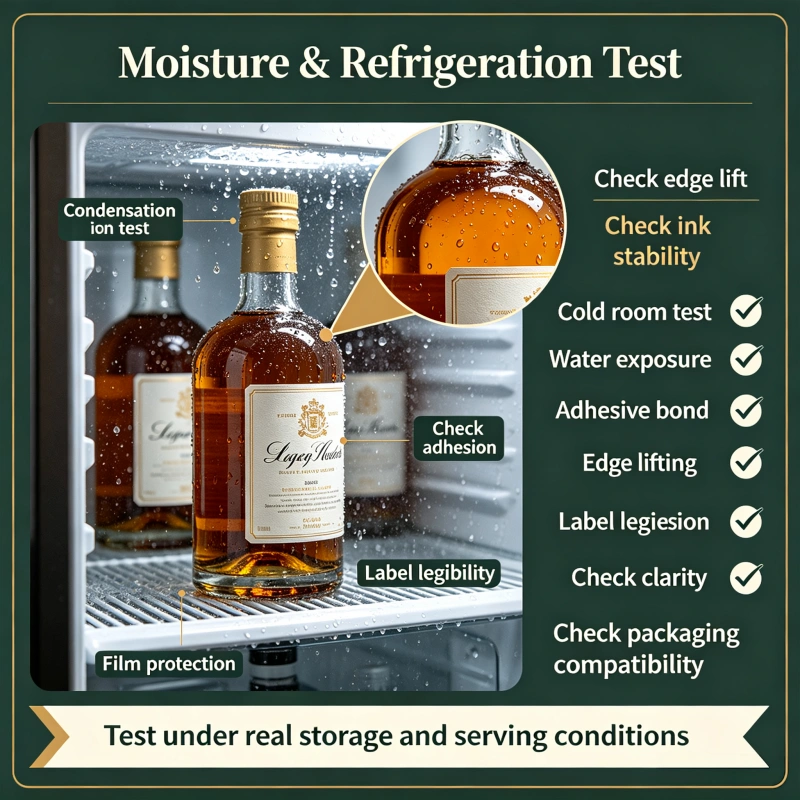
If the bottle is refrigerated
Put the labeled bottle into the refrigerator and observe:
- Edge lifting
- Wrinkling
- Moisture penetration
- Adhesive failure
- Ink or coating changes
If the bottle will be placed in an ice bucket
Test the label against:
- Condensation
- Water
- Repeated handling
- Cold temperatures
If bottles will be transported internationally
Test:
- Carton vibration
- Stacking
- Humidity
- Temperature changes
- Rubbing between bottles or packaging
This is where many label problems are discovered before mass production.
The 10 Most Common Custom Liquor Bottle Label Mistakes
1. Designing before measuring the bottle
A beautiful label is useless if it does not fit.
Solution: Obtain the actual bottle dimensions or send a physical bottle to the label manufacturer.
2. Choosing material based only on appearance
A beautiful textured paper may not perform well under heavy condensation.
Solution: Choose material based on the storage and handling environment.
3. Ignoring the adhesive
Many buyers focus on the printed surface and forget the adhesive.
Solution: Tell the manufacturer exactly how and where the bottles will be stored.
4. Using tiny regulatory text
A designer may reduce mandatory information to make the front label look cleaner.
This can create compliance and readability problems.
Solution: Check applicable regulations before artwork approval.
5. Skipping physical samples
This is particularly risky for unusual bottles.
Solution: Approve a physical sample before mass production.
6. Ordering too many labels
New brands sometimes order tens of thousands of labels before confirming product-market demand.
Solution: Consider a smaller initial run or digital printing for new SKUs.
7. Ordering too few labels
The opposite problem is also common.
If the brand launches successfully, a small initial quantity can create frequent reorders and higher unit costs.
Solution: Compare the economics of several quantity levels before approving the order.
8. Forgetting variable information
If your label requires batch numbers, lot codes or different ABV/product information, confirm how these will be printed.
9. Not checking the barcode
A barcode that looks correct may still fail to scan.
Solution: Scan the production sample before mass production.
10. Treating every market as having the same regulations
A label designed for one country may not automatically satisfy another country’s requirements.
Solution: Confirm the rules for every target market.
How to Avoid Being Overcharged for Custom Liquor Bottle Labels
The cheapest quote is not always the lowest total cost.
When comparing suppliers, request the same specifications from every manufacturer:
Label size + material + adhesive + printing + finishing + quantity + packaging + shipping terms.
For example, do not compare:
Supplier A: $0.08/label
against:
Supplier B: $0.11/label
without checking what is included.
Supplier A may be quoting:
- Standard paper
- Basic CMYK printing
- No lamination
- No foil
- No special adhesive
while Supplier B may include:
- Premium textured stock
- Waterproof film
- Gold foil
- Die cutting
- Stronger adhesive
- Individual packaging
The correct comparison is apples to apples.
How to Reduce Custom Label Costs
You can reduce cost without making the label look cheap.
Use the right printing method
Small orders may be more economical digitally, while larger repeat orders may benefit from conventional processes.
Simplify finishing
Instead of using foil, embossing, spot UV and specialty materials simultaneously, identify the one or two effects that contribute most to the brand.
Standardize label sizes
If several products can share similar label dimensions, production can become easier.
Consolidate SKUs
If several flavors or variants use the same basic label structure, you may reduce design and setup complexity.
Order according to realistic demand
The lowest unit price is meaningless if half the labels remain unused.
How to Order Custom Liquor Bottle Labels from a Manufacturer
For a commercial order, provide the manufacturer with a complete specification.
A useful RFQ should include:
Product: Custom liquor bottle labels
Bottle type: Glass / PET / other
Bottle dimensions: Height × diameter/circumference
Label size: Width × height
Label position: Front/back / neck / wrap-around
Material: Paper / PP / PET / clear / textured / metallic
Adhesive: Standard/waterproof/refrigerated / other
Printing: CMYK / Pantone / spot colors
Finishing: Matte / gloss / foil / embossing / UV / lamination
Quantity: Number of labels
Number of SKUs: Number of designs
Application: Manual or automatic
Storage: Ambient/refrigerated / ice bucket / humid environment
Target market: Country or region
Required delivery date: Date required
The more complete the specification, the less likely you are to receive an inaccurate quotation.
A Practical Custom Liquor Label Production Workflow
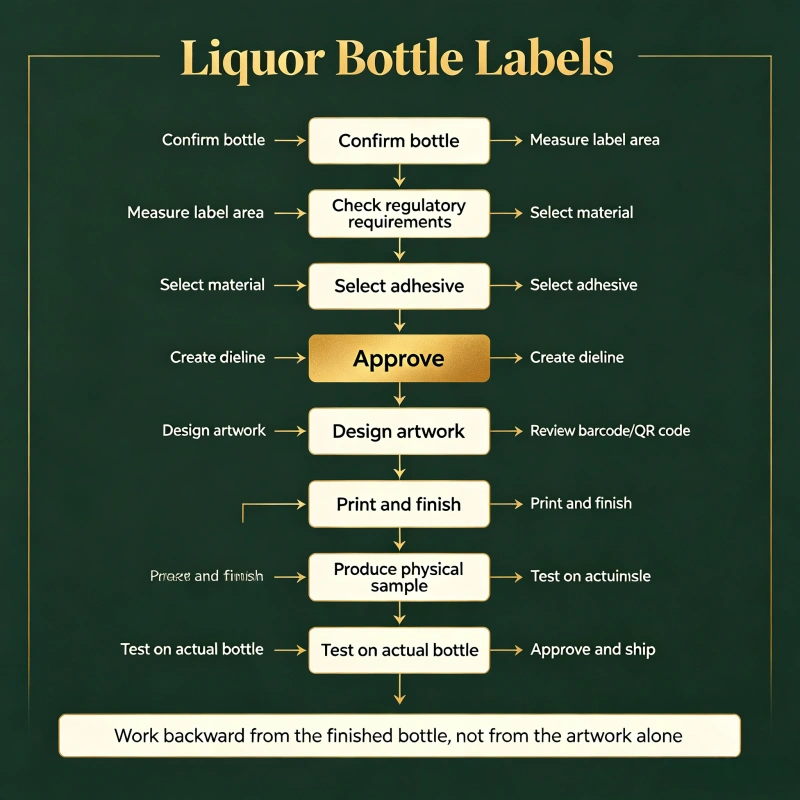
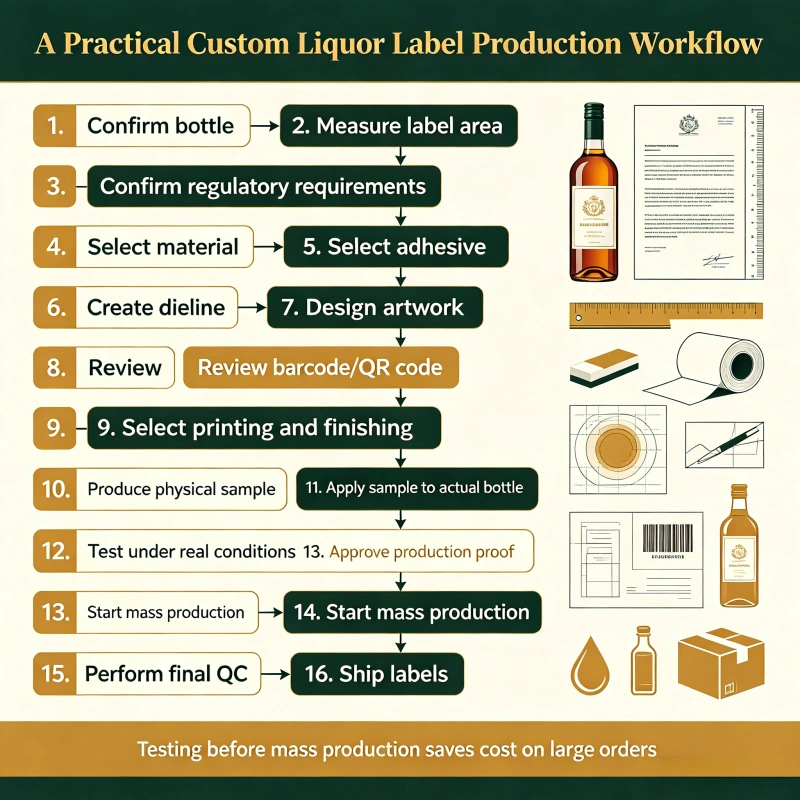
For most projects, the process can be organized into these stages:
1. Confirm bottle
↓
2. Measure label area
↓
3. Confirm regulatory requirements
↓
4. Select material
↓
5. Select adhesive
↓
6. Create dieline
↓
7. Design artwork
↓
8. Review barcode/QR code
↓
9. Select printing and finishing
↓
10. Produce physical sample
↓
11. Apply sample to actual bottle
↓
12. Test under real conditions
↓
13. Approve production proof
↓
14. Start mass production
↓
15. Perform final QC
↓
16. Ship labels
This workflow may seem slower than uploading artwork and ordering labels, but it can save substantial money on large orders.
Custom Liquor Bottle Label Quality Control Checklist
Before accepting the production batch, inspect:
| QC Item | What to Check |
|---|---|
| Dimensions | Correct width and height |
| Quantity | Actual quantity matches order |
| Material | Correct substrate |
| Color | Consistent with approved sample |
| Text | No spelling or content errors |
| Logo | Correct version |
| Barcode | Scans correctly |
| QR code | Opens the intended destination |
| Adhesive | No premature lifting |
| Die cut | Clean and accurate |
| Foil | Correct position and coverage |
| Embossing | Correct depth and registration |
| Surface | No scratches, stains or printing defects |
| Packaging | Labels protected during transportation |
For high-volume production, ask the manufacturer to keep an approved master sample for comparison.
How Much Do Custom Liquor Bottle Labels Cost?
There is no single universal price.
The final cost depends on:
- Label dimensions
- Quantity
- Material
- Number of colors
- Printing method
- Adhesive
- Die-cut shape
- Lamination
- Foil
- Embossing
- Number of SKUs
- Packaging
- Shipping
A simple small paper label can cost dramatically less than a premium textured label using foil, embossing and specialty adhesive.
For B2B purchasing, it is better to request quotes at several quantities, such as:
- 500 pieces
- 1,000 pieces
- 5,000 pieces
- 10,000 pieces
- 25,000 pieces
- 50,000+ pieces
This shows where the unit-cost curve changes.
More importantly, ask the supplier to separate setup/tooling costs and unit printing costs so you can understand the real economics of the order.
Video on wine label printing
Discover how premium wine labels are printed from artwork preparation and material selection to color printing, finishing, die cutting, and quality inspection. This video shows the complete wine label printing process, highlighting advanced equipment, precise color reproduction, specialty finishes, and quality control for durable, attractive labels designed for wine brands.
Frequently Asked Questions
Can I make liquor bottle labels at home?
Yes, for prototypes, gifts, events or very small quantities, you can design and print labels yourself using a home printer and suitable adhesive label stock.
However, commercial liquor brands normally need better control over color, material, adhesive, finishing, durability and regulatory information.
For a retail product, professional label production is usually more practical.
What is the best material for liquor bottle labels?
There is no single best material.
Textured and specialty papers are popular for premium spirits because of their tactile appearance. PP, PET and other synthetic materials can be more suitable when moisture and condensation resistance are important.
The best material depends on the bottle, storage environment, brand positioning and budget.
Can liquor bottle labels be waterproof?
Yes.
Water-resistant or waterproof label solutions can use synthetic substrates, suitable coatings or laminations and adhesives designed for the intended environment.
However, don’t treat “waterproof” as a generic specification. Tell your supplier whether the bottles will experience refrigeration, condensation, ice buckets or prolonged water exposure.
Can I use clear labels on liquor bottles?
Yes.
Clear labels are commonly used when the designer wants the glass bottle to remain visually prominent.
They can create a premium no-label look, especially on clear glass.
However, consider white ink and color opacity when preparing artwork.
How do I prevent liquor bottle labels from peeling?
Start with the correct adhesive.
Then make sure the bottle surface is:
- Clean
- Dry
- Free of oil
- Free of dust
- Suitable for the adhesive
If the bottles are refrigerated or exposed to condensation, test the adhesive under those conditions before mass production.
Should I use paper or plastic labels for liquor bottles?
Use paper when tactile appearance and traditional premium aesthetics are priorities.
Consider synthetic materials when durability, moisture resistance and refrigeration performance are more important.
For many brands, the decision is not simply “paper versus plastic”; it is a balance between appearance, durability, application conditions and brand positioning.
What finish makes a liquor bottle label look expensive?
No single finish automatically makes a label look premium.
Popular combinations include:
- Textured paper + embossing
- Matte surface + gold foil
- Dark stock + metallic foil
- Clear film + selective white ink
- Matte label + spot UV
- Premium paper + subtle debossing
The best results usually come from using one or two finishes strategically rather than adding every available effect.
How large should a liquor bottle label be?
The correct size depends on the bottle.
Measure the usable straight surface rather than simply calculating the entire bottle circumference.
For unusual, tapered or embossed bottles, make a physical mock-up or use the actual bottle before finalizing the size.
Do liquor bottle labels need to include alcohol content?
Requirements depend on the product and sales market.
For U.S. distilled spirits, TTB states that an alcohol-content statement is required and must meet specific placement, format and legibility requirements.
Always verify the current requirements applicable to your exact product and destination market before printing.
Do I need regulatory approval before printing custom liquor labels?
Potentially, depending on the jurisdiction and product.
In the United States, TTB provides a Certificate of Label Approval process for applicable alcohol products and publishes a mandatory-information checklist for distilled spirits.
Do not assume that a label approved for another product or market can simply be reused.
Can I print different liquor flavors on the same label order?
Yes, but clearly identify each SKU during the quotation and proofing process.
For example, a gin brand might have:
- Original Gin
- Citrus Gin
- Pink Gin
- Navy Strength Gin
If the basic design is identical but product names, colors or regulatory information differ, ask the printer how multiple SKUs will affect setup and unit pricing.
Should I order labels before my bottles arrive?
It is safer to confirm the bottle first.
Even small differences in bottle dimensions or curvature can affect label performance.
For a new bottle, send the manufacturer an actual bottle or accurate technical drawing before approving the final label dimensions.
What is the biggest mistake when ordering custom liquor bottle labels?
For most new projects, the biggest avoidable mistake is treating the label as a graphic-design job rather than a packaging-engineering job.
The design, bottle, material, adhesive, printing method, finishing and application process all have to work together.
A label that looks beautiful but peels in a refrigerator is not a successful label.
Final Checklist Before You Approve Production
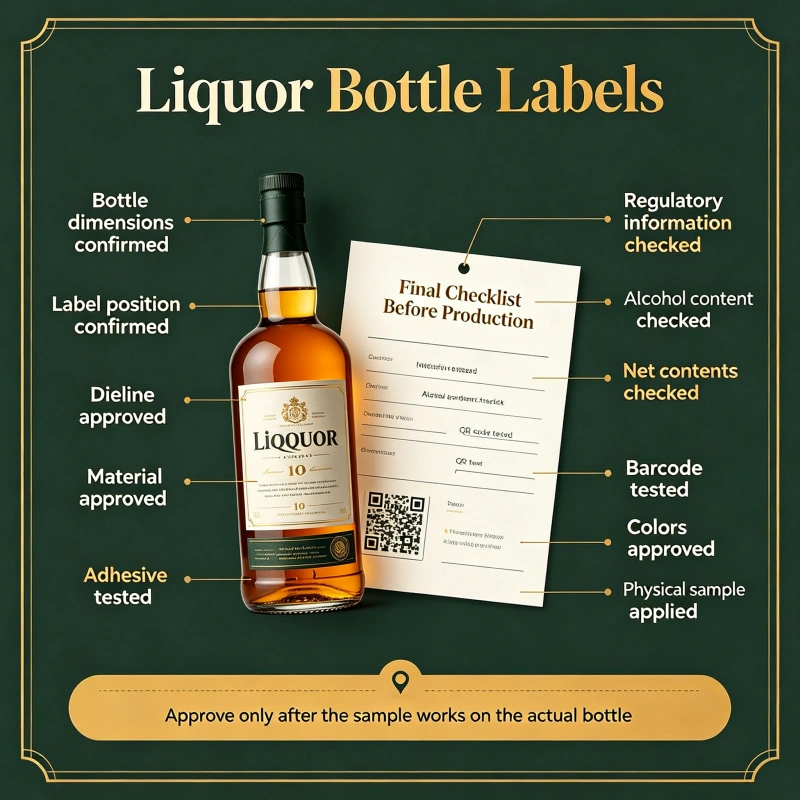
Before giving your manufacturer the final approval, confirm these points:
- Actual bottle dimensions confirmed
- Label position confirmed
- Dieline approved
- Material approved
- Adhesive tested
- Regulatory information checked
- Alcohol content checked
- Net contents checked
- Brand and product names checked
- Barcode tested
- QR code tested
- Colors approved
- Finishing approved
- Physical sample applied to the actual bottle
- Refrigeration/condensation test completed if necessary
- Quantity confirmed
- Delivery date confirmed
- Packaging method confirmed
- Final production proof approved
The most reliable way to make custom liquor bottle labels is to work backward from the finished bottle and its real-world environment. Start with the bottle, define the usable label area, confirm regulatory requirements, choose the material and adhesive, prepare the artwork, produce a physical sample, test it under actual conditions, and only then move to mass production.
That approach prevents the most expensive problems: incorrect dimensions, unsuitable materials, adhesive failure, unreadable information, poor finishing, and thousands of unusable labels.
For a commercial spirits brand, the goal should not simply be to make a beautiful label. The goal is to produce a label that fits correctly, performs reliably, communicates the product clearly, satisfies applicable requirements, and supports the brand at the point of sale.

Jgs is a custom labeling professional with 15 years of industry experience in labeling solutions.