
How to Use Sticker Paper: A Complete Guide
Sticker paper is easy to use once you understand how to select the right material, print on the correct side, set up your design, cut the stickers, and apply them to a suitable surface. Whether you are making stickers at home, creating product labels for a small business, or sourcing custom stickers for a retail brand, the most important rule is to match the sticker paper to your printer, application surface, and intended environment.
As a custom label manufacturer, we work with different self-adhesive materials for product packaging, retail stickers, promotional labels, bottle labels, and industrial applications. We have found that many sticker problems do not originate in the artwork itself. They happen because the paper is incompatible with the printer, the adhesive does not match the surface, or the finished sticker is exposed to water before it is ready.
In this guide, we explain how to use sticker paper step by step, how to avoid common printing and application problems, and how to choose the right material when you need custom stickers in bulk.
What Is Sticker Paper?
Sticker paper is a printable or preprinted material with an adhesive layer on the back and a release liner that protects the adhesive before use.
A typical pressure-sensitive sticker consists of three main layers:
- Face material: The printable surface, which may be paper, synthetic paper, vinyl, PET, or another film.
- Adhesive: The layer that bonds the sticker to the target surface.
- Release liner: The backing paper or film that protects the adhesive and allows the sticker to be peeled off.
Some sticker constructions also include a protective coating or laminate to improve resistance to moisture, scratches, and handling.
The type of face material determines how the sticker looks and prints. The adhesive determines how it sticks. The protective finish affects how well it withstands the conditions where it will be used.
For example, ordinary paper sticker sheets often suit planners, packaging seals, and indoor crafts. Synthetic films such as vinyl or PET are generally more appropriate when water resistance, tear resistance, or longer service life is required. The correct choice depends on the complete construction, not just the material name.
Step 1: Choose the Right Type of Sticker Paper
Before printing anything, decide what the sticker needs to do. A decorative sticker for a notebook has different requirements from a waterproof label for a beverage bottle.
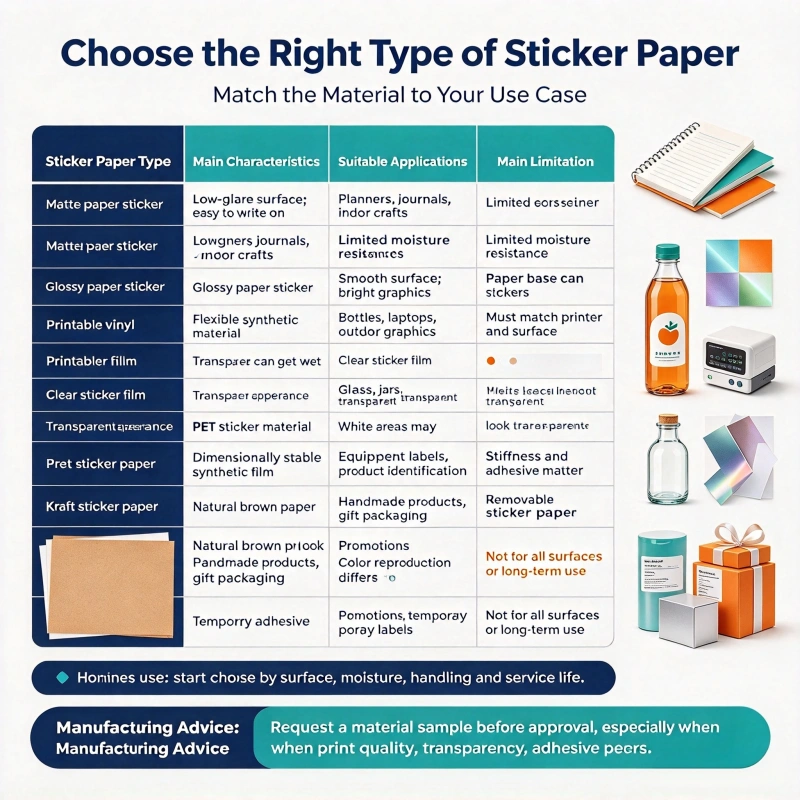
| Sticker paper type | Main characteristics | Suitable applications | Main limitation |
|---|---|---|---|
| Matte paper sticker | Low-glare surface; often easy to write on | Planners, journals, indoor crafts | Limited moisture resistance |
| Glossy paper sticker | Smooth surface and bright-looking graphics | Packaging seals, retail stickers, promotional labels | Paper base can deteriorate when wet |
| Printable vinyl | Flexible synthetic face material | Bottles, laptops, outdoor graphics, promotional stickers | Must match printer and application requirements |
| Clear sticker film | Transparent appearance | Glass, jars, transparent packaging | White areas may appear transparent without white ink |
| PET sticker material | Dimensionally stable synthetic film | Equipment labels, product identification | Stiffness and adhesive must suit the surface |
| Kraft sticker paper | Natural brown paper appearance | Handmade products, gift packaging, kraft boxes | Color reproduction differs from white materials |
| Removable sticker paper | Adhesive designed for temporary use | Promotions, temporary labels, selected retail applications | Not intended for every surface or long-term exposure |
| Metallic or holographic material | Decorative reflective effects | Branding, gift packaging, premium product labels | Artwork and color appearance require careful testing |
For home use, matte and glossy printable sticker sheets are convenient starting points. For business use, we recommend selecting the material based on the product’s surface, expected handling, moisture exposure, and required service life.
Our manufacturing advice: Never approve a sticker material based only on a product photograph. Request a material sample when print quality, transparency, adhesive performance, or durability is important.
Step 2: Check Whether Your Sticker Paper Is Compatible With Your Printer
We recommend checking this first before you load a sheet.
Inkjet and laser printers use different printing technologies. Inkjet printers deposit liquid ink onto a compatible coating, while laser printers use toner and heat. Sticker paper must be designed for the intended printing technology.
How to identify compatible sticker paper
Check the package or technical data sheet for wording such as:
- Inkjet printable
- Laser printable
- Inkjet and laser compatible
- Printable vinyl for inkjet printers
- Laser-compatible synthetic label material
Do not assume that all sticker paper works in every printer. Some films or coatings may not tolerate laser-printer heat, while some surfaces may not absorb inkjet ink properly. Manufacturers of printable sticker products explicitly specify printer compatibility, and some waterproof sticker materials are designed for inkjet use only.
Inkjet vs. laser sticker paper
| Feature | Inkjet sticker paper | Laser sticker paper |
|---|---|---|
| Printing method | Liquid ink | Toner fused using heat |
| Common use | Colorful graphics, photos, crafts | Text, graphics, office and label printing |
| Material requirement | Ink-receptive surface | Heat-compatible construction |
| Common problem | Smudging or ink spreading | Curling, heat damage, or poor toner adhesion if incompatible |
| Best practice | Use the recommended media setting | Confirm the material is rated for laser printing |
If you are unsure which side is printable, check the manufacturer’s instructions. You can also mark a corner of a regular test sheet to confirm how your printer feeds paper before using the sticker sheet.
Step 3: Prepare Your Sticker Design
A good design helps prevent waste and improves the finished sticker’s appearance.
You can create sticker artwork in design software such as Adobe Illustrator, Photoshop, Canva, or other applications that support your printer or cutting machine’s required dimensions and file format.
Set the correct sticker dimensions
Before designing, decide:
- Finished sticker width and height
- Shape: circle, rectangle, oval, or custom contour
- Spacing between stickers
- Distance from the sheet edges
- Bleed and safe area
- Whether the sticker needs a border or cutting outline
For example, define the finished dimensions of a 50 × 30 mm sticker before arranging multiple copies on an A4 sheet.
A4 paper measures 210 × 297 mm. However, you may not be able to fit stickers across the entire sheet because printers have non-printable margins, and cutting requires extra spacing.
For a simple rectangular layout, you can estimate the number of stickers per row using:
[
N=\left\lfloor\frac{W-2M+G}{S+G}\right\rfloor
]
Where:
- (W) = sheet width
- (M) = side margin
- (G) = gap between stickers
- (S) = sticker width
For example, with a 210 mm-wide sheet, 5 mm side margins, 3 mm gaps, and 50 mm-wide stickers:
[
N=\left\lfloor\frac{210-10+3}{50+3}\right\rfloor=3
]
This layout fits three stickers across the sheet. The actual layout must also account for the printer’s printable area and the stickers’ height.
Use adequate image resolution
For many printed sticker designs, 300 pixels per inch (PPI) at final size is a practical starting point for raster artwork.
For example, a 2 × 2 inch sticker designed at 300 PPI requires a raster image of approximately 600 × 600 pixels.
Small text, barcodes, and fine line work may need additional attention. Vector artwork is often preferable for logos and sharp text because it can scale without the same pixelation limitations as raster images.
Leave enough space around the artwork
Do not place critical text too close to the cutting line. A small cutting variation can make the design appear off-center or cut into the lettering.
For custom die-cut stickers, confirm the bleed, cut path, and safe area with the printer or manufacturer before approving the artwork.
Step 4: Set Up Your Printer Correctly
Once your artwork is ready, configure your printer according to the sticker material.
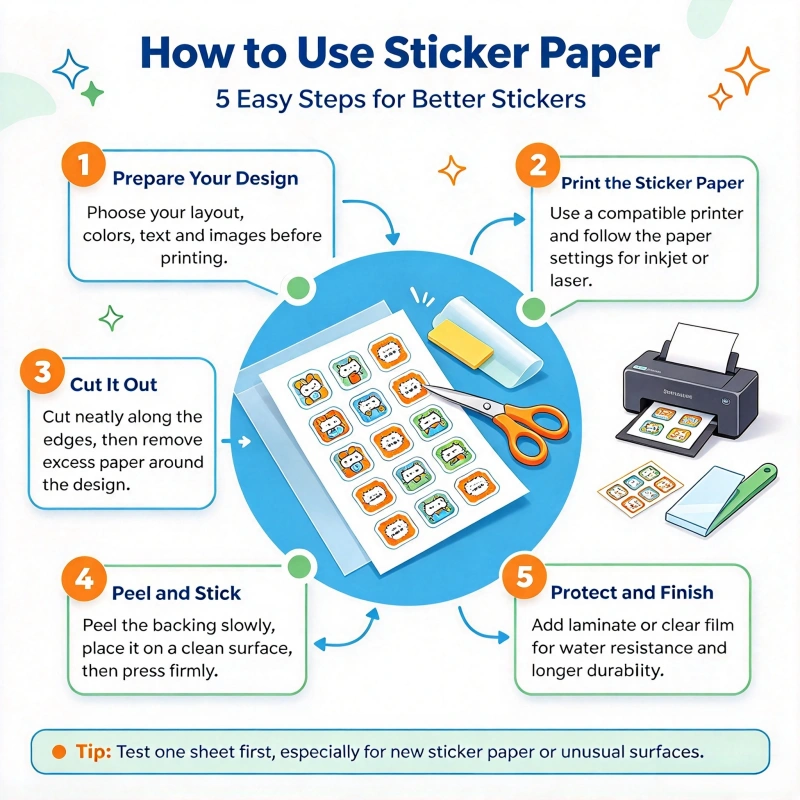
1. Load the sheet in the correct direction
Identify which side receives the ink or toner. Follow the printer’s paper-loading instructions, particularly if the machine prints on only one side of the sheet.
2. Select the appropriate media setting
Depending on the sticker paper and printer, the recommended setting may be matte paper, glossy paper, photo paper, labels, or another compatible media type.
Use the setting specified by the sticker-paper manufacturer whenever possible.
3. Choose the print quality
For stickers with detailed logos or small text, start with a high-quality setting and check the results. Higher-quality printing can improve detail, but it may also increase ink use and drying time.
4. Print a test page
Before using your adhesive sheet, print the design on ordinary paper.
Check:
- Sticker dimensions
- Alignment
- Spacing
- Text readability
- Color balance
- Cutting-line position
This simple step can save material, especially when a sheet contains many stickers.
5. Print one sticker sheet first
Use one sheet to verify the media feed, color, ink adhesion, and cutting alignment. If the result is correct, continue with the remaining sheets.
Step 5: Let the Printed Sticker Paper Dry
After printing, let the sheet dry before touching, stacking, cutting, or laminating it.
Drying time depends on the printer, ink, coating, humidity, and print coverage. Some printable sticker instructions recommend waiting about 10–15 minutes for inkjet prints, but this isn’t a universal rule. citeturn644947search6
We recommend checking the media manufacturer’s instructions and testing the actual printed material.
How to avoid smudging
- Do not touch printed areas immediately.
- Avoid stacking fresh prints face-to-face.
- Keep sheets flat in a clean, dry location.
- Avoid excessive ink coverage when it is not necessary.
- Confirm that the selected print setting matches the coating.
If the ink smears after the recommended drying period, the problem may be incompatible sticker paper, an incorrect media setting, or excessive ink deposition. Waiting longer will not always fix it.
Step 6: Add Lamination if Your Stickers Need More Protection
Lamination applies a protective film over the printed sticker surface.
It can improve resistance to scuffing and handling and, when materials are matched correctly, help protect the print from moisture.
However, lamination does not automatically make every sticker waterproof. The face material, ink, laminate, adhesive, edges, and application surface all affect the result.
When should you laminate sticker paper?
Lamination may be useful for:
- Stickers exposed to frequent handling
- Product labels that need additional surface protection
- Promotional stickers used on frequently touched items
- Selected bottle or packaging labels
- Decorative stickers that need a particular gloss or matte finish
For ordinary paper stickers used in planners or indoor crafts, lamination may be unnecessary.
For outdoor or frequently wet applications, consider a compatible synthetic face material and protective finish instead of assuming that laminated paper will withstand every condition.
Manufacturer’s tip: Test the complete sticker construction. A film that bonds well to the ink surface may still fail if its adhesive isn’t suited to the application surface.
Step 7: Cut Your Sticker Paper
You can cut sticker paper in several ways. The best method depends on the quantity, shape, and level of precision required.
Hand cutting
Scissors or a craft knife are suitable for small quantities and simple shapes.
This method is inexpensive but can be slow for complex designs or large production runs.
Cutting machine
A compatible cutting machine can cut circles, decorative contours, and other custom shapes. For print-and-cut workflows, the machine needs to align its cutting path with the printed artwork.
Before cutting a full batch, verify the cut alignment on a sample sheet.
Kiss-cut vs. die-cut
These two terms describe different finishing methods.
| Cutting method | What is cut | Typical use |
|---|---|---|
| Kiss-cut | The sticker face and adhesive, while the release liner remains intact | Sticker sheets, multiple designs on one backing |
| Die-cut | The complete sticker construction, including its backing | Individual stickers supplied separately |
For small businesses selling sticker sheets, kiss-cutting can make it easier for customers to peel individual designs. Individual die-cut stickers may suit giveaways, retail packs, or promotional distribution.
For custom manufacturing, agree on the cutting method before production because it affects tooling, layout, packing, and final presentation.
Step 8: Prepare the Surface Before Applying Your Sticker
Even high-quality sticker paper can peel if it is applied to an unsuitable or contaminated surface.
Before applying the sticker:
- Remove dust and loose particles.
- Clean the surface using a method compatible with the material.
- Allow the surface to dry completely.
- Check for oil, wax, or other contamination.
- Confirm that the surface is suitable for the adhesive.
- Avoid applying the sticker over loose coatings or peeling paint.
For glass or other nonporous surfaces, use a suitable cleaning method and let any residue evaporate. Avoid aggressive solvents on plastics or coated surfaces unless you confirm compatibility.
Why does a sticker peel off?
Common reasons include:
- Applying the sticker to a dirty or oily surface
- Choosing the wrong adhesive
- Applying it to a textured or low-energy plastic surface
- Working outside the recommended application temperature
- Applying it to a wet or condensed surface
- Handling the sticker before the adhesive has developed sufficient contact
Adhesive performance depends on the combination of adhesive chemistry, surface energy, surface condition, pressure, and time. A sticker that adheres well to clean glass may not behave the same way on untreated polyethylene or polypropylene.
Step 9: Apply Sticker Paper Without Bubbles or Wrinkles
For a small, flat sticker, the application process is straightforward.
Step-by-step application
Step 1: Position the sticker. Before removing the backing, check the intended placement and orientation.
Step 2: Peel back part of the liner. Avoid touching the adhesive more than necessary.
Step 3: Align the exposed edge. Place the sticker gently onto the surface.
Step 4: Apply gradual pressure. Use your fingers or a suitable squeegee to work from the center outward.
Step 5: Remove the remaining liner. Continue applying the sticker gradually instead of dropping the entire adhesive surface at once.
Step 6: Press the edges. Make sure the edges have full contact with the surface.
Step 7: Inspect the result. Check for bubbles, creases, contamination, and lifting corners.
For larger stickers, gradual application is especially useful because it reduces the chance of trapping air beneath the material.
What about curved bottles?
A flat sticker can behave differently on a cylindrical or tapered bottle.
For bottle labels, check:
- Bottle diameter at the application point
- Taper and curvature
- Label dimensions
- Material flexibility
- Adhesive suitability
- Condensation and moisture exposure
A small label may conform well to a curved bottle, while a large, stiff label can develop wrinkles or lifted edges.
For commercial bottle decoration, we recommend applying a prototype to the actual bottle and checking the result before approving mass production.
Step 10: Choose Sticker Paper for Your Specific Application
The best sticker paper depends on what the finished sticker needs to withstand.
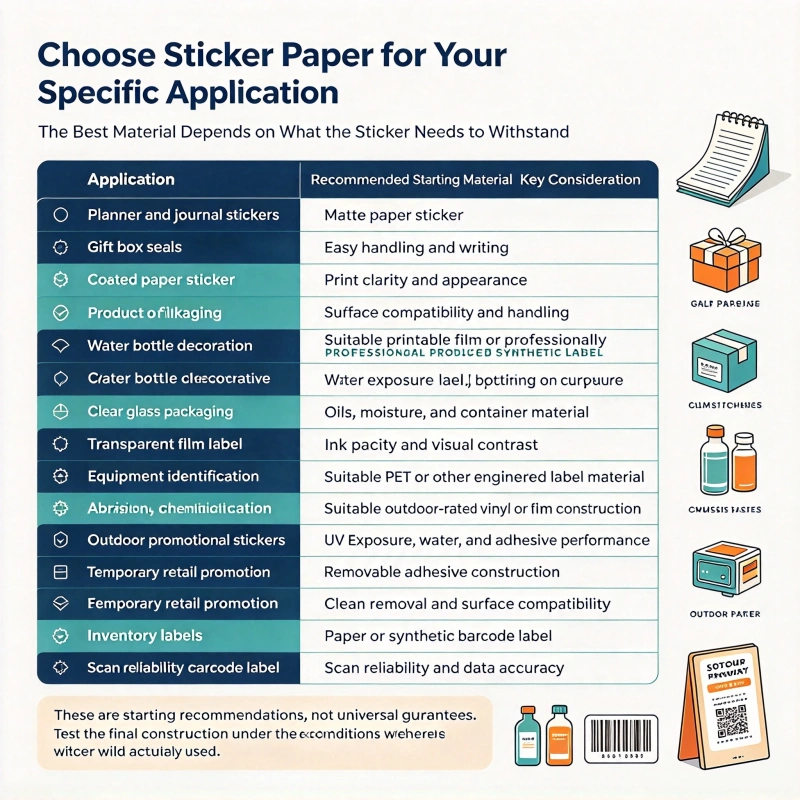
| Application | Recommended starting material | Key consideration |
|---|---|---|
| Planner and journal stickers | Matte paper sticker | Easy handling and writing |
| Gift box seals | Coated paper sticker | Print clarity and appearance |
| Product packaging | Paper or film label | Surface compatibility and handling |
| Water bottle decoration | Suitable printable film or professionally produced synthetic label | Water exposure and bottle curvature |
| Cosmetic jars | Film or paper label, depending on exposure | Oils, moisture, and container material |
| Clear glass packaging | Transparent film label | Ink opacity and visual contrast |
| Equipment identification | Suitable PET or other engineered label material | Abrasion, chemicals, and temperature |
| Outdoor promotional stickers | Suitable outdoor-rated vinyl or film construction | UV exposure, water, and adhesive performance |
| Temporary retail promotion | Removable adhesive construction | Clean removal and surface compatibility |
| Inventory labels | Paper or synthetic barcode label | Scan reliability and data accuracy |
These are starting recommendations, not universal guarantees. Test the final construction under the conditions where the sticker will actually be used.
How to Use Sticker Paper for a Small Business
For a small business, sticker paper can create branded packaging, seal shipping boxes, identify products, decorate retail packaging, and support promotional campaigns.
However, home printing and commercial sticker production serve different purposes.
When home printing makes sense
Home printing is useful when you need:
- Small quantities
- Rapid design changes
- Prototype labels
- Seasonal artwork
- Personalization
- Samples for customer approval
It allows you to test an idea before committing to a larger order.
When to work with a custom sticker manufacturer
Professional manufacturing becomes worth considering when you need:
- Consistent color across repeated orders
- Large quantities
- Multiple material choices
- Custom shapes and precise die-cutting
- Specialized adhesives
- Waterproof or chemical-resistant constructions
- Roll labels for automated application
- Specialty finishes such as foil, embossing, or holographic effects
- Controlled production and inspection
In our experience, the key question is not simply whether a factory can print the artwork. It is whether the factory can reproduce the same material, color, cutting accuracy, adhesive performance, and packing format across the required quantity.
Our Custom Sticker Paper and Label Manufacturing Solutions
As a custom label manufacturer, we help B2B buyers select the appropriate construction for product stickers, packaging labels, promotional stickers, and other self-adhesive applications.
We assess each project based on its intended use rather than offering one material for every application.
What can we customize?
Depending on the selected product and production route, customization can include:
- Paper, synthetic paper, PET, PP, and other suitable face materials
- Matte, gloss, transparent, metallic, and specialty finishes
- Custom sizes, shapes, and die-cutting
- Brand colors, logos, and variable artwork
- Permanent, removable, and application-specific adhesives
- Sheet or roll formats
- Barcode and QR-code printing
- Specialty effects such as foil stamping or other decorative finishes
- OEM production based on approved customer artwork
- ODM assistance with material selection and label construction
- Customized packing for different SKUs or distribution requirements
Not every material, finish, and adhesive can be combined with every printing process. We confirm compatibility during specification review and sampling.
What production equipment is involved?
The production route depends on the product type, order volume, and required finish. A custom sticker order may involve:
- Digital or conventional printing equipment
- Die-cutting and slitting equipment
- Finishing and laminating processes
- Inspection and quality-control equipment
- Sheet or roll converting and packing processes
For specialized products, buyers should confirm which processes are performed in-house and which are handled by qualified manufacturing partners.
Our aim is to recommend a production method that meets the specification, quantity, and cost target without adding unnecessary processing steps.
MOQ and Custom Sticker Price: What Should Buyers Expect?
There is no universal MOQ or unit price for sticker paper because material, size, printing, adhesive, finish, order quantity, and packing all influence the quotation.
The following figures are illustrative budgeting ranges in USD, not verified quotations for a specific factory order.
| Product type | Indicative MOQ | Indicative unit price |
|---|---|---|
| Basic paper stickers | 500–1,000 pcs | $0.01–$0.05 |
| Custom paper product labels | 1,000–5,000 pcs | $0.005–$0.04 |
| Custom film or vinyl stickers | 500–2,000 pcs | $0.02–$0.12 |
| Clear film stickers | 1,000–5,000 pcs | $0.02–$0.10 |
| Specialty metallic or holographic stickers | 1,000–5,000 pcs | $0.03–$0.15 |
| Custom die-cut promotional stickers | 500–2,000 pcs | $0.02–$0.15 |
These ranges are intended for initial budgeting only. Small orders, unusually large labels, complex shapes, specialty materials, and premium finishing can cost more. Large repeat orders may have lower unit prices, depending on the production method and specification.
What determines the price?
1. Material selection
Paper, film, vinyl, metallic substrates, and specialty stocks have different material costs.
2. Sticker size
Larger stickers generally consume more material and may reduce the number of units produced from each sheet or roll.
3. Order quantity
Setup and preparation costs can be distributed across more units in larger orders. However, multiple designs may require separate setup or processing.
4. Printing and finishing
Complex colors, special inks, lamination, foil stamping, and custom die-cutting can affect the total cost.
5. Adhesive requirements
Standard and specialized adhesives for difficult surfaces or demanding environments are not necessarily interchangeable.
6. Packing format
Sheets, rolls, individual packs, and SKU-separated cartons can require different converting and packing processes.
How to request an accurate quotation
Send us the sticker dimensions, material preference, artwork, quantity per design, application surface, expected environment, finish, and required packing format.
For bottle labels or industrial applications, also specify exposure to moisture, chemicals, temperature, sunlight, and handling. These details help us assess the appropriate construction before quoting.
Our OEM and ODM Process for Custom Stickers
For B2B projects, we recommend a clear development process.
Step 1: Understand the application
We confirm what the sticker will be used for, where it will be applied, and what performance requirements it must meet.
Step 2: Review the artwork and dimensions
We check the file format, finished size, cutting line, text, color references, and layout.
Step 3: Recommend the material and adhesive
We propose a suitable construction based on the surface, environment, appearance, and budget.
Step 4: Confirm MOQ and quotation
We establish the quantity per design, production method, finishing requirements, packing, and commercial terms.
Step 5: Produce a sample
For new materials or demanding applications, we recommend approving a physical sample before mass production.
Step 6: Manufacture and inspect
Depending on the specification, quality checks may cover print clarity, color, dimensions, die-cutting, adhesive condition, and surface finish.
Step 7: Pack and ship
We pack the order according to the agreed format and separate designs or SKUs where required.
This process reduces the risk of discovering a material or application problem after the full order has been produced.
Common Sticker Paper Problems and How to Solve Them
Problem 1: The ink smears
Likely cause: The sticker paper is incompatible with the printer, the media setting is incorrect, or the ink has not dried sufficiently.
Solution: Confirm printer compatibility, follow the recommended media setting, and test the drying time before handling the sheet.
Problem 2: The sticker curls
Likely cause: Moisture, heat, tension, or unsuitable storage conditions affect the material.
Solution: Store the sheets flat in the recommended environment and use a material suitable for the printer and application.
Problem 3: The sticker peels at the edges
Likely cause: The surface is contaminated, the adhesive is unsuitable, or the label is under excessive stress on a curved surface.
Solution: Clean the surface, verify the adhesive, and test the label on the actual product.
Problem 4: The sticker is not waterproof
Likely cause: The face material is paper-based, the ink is not water-resistant, the protective finish is unsuitable, or water reaches the edges.
Solution: Select a compatible synthetic material and protective finish, then test the completed construction under realistic conditions.
Problem 5: The cutting line is misaligned
Likely cause: Incorrect page scaling, inaccurate registration, or a mismatch between the artwork and cutting file.
Solution: Print a test sheet, confirm that scaling is set correctly, and calibrate the cutting machine before running the full batch.
Problem 6: The sticker will not stick to plastic
Likely cause: The plastic has low surface energy or the surface contains mold-release residue or other contamination.
Solution: Identify the plastic type and request an adhesive designed for that surface. Test before ordering in bulk.
Frequently Asked Questions About How to Use Sticker Paper
Which side of sticker paper should I print on?
Print on the designated printable surface, usually the coated side. Check the manufacturer’s instructions because different materials and printers may feed sheets differently.
Can I use sticker paper in a normal printer?
Yes, provided the sticker paper is compatible with the printer’s technology and paper-feed requirements. Use inkjet-compatible media in inkjet printers and laser-rated media in laser printers.
How long should I wait for sticker paper to dry?
It depends on the ink, coating, print coverage, humidity, and printer settings. Some inkjet sticker products recommend around 10–15 minutes, but you should follow the material manufacturer’s instructions and verify that the print is dry before handling.
Is sticker paper waterproof?
Ordinary paper sticker sheets are generally not suitable for prolonged water exposure. Synthetic materials such as suitable vinyl or PET can offer better water resistance, but the ink, adhesive, laminate, and application surface must also be appropriate.
Can I make waterproof stickers at home?
Yes, for suitable applications you can use compatible printable synthetic sticker material and a matching protective laminate. However, the finished result should be tested because water resistance depends on the complete construction.
Can sticker paper be used on water bottles?
It can be used for decoration, but ordinary paper sticker sheets may deteriorate when wet. For bottles exposed to condensation or washing, select an appropriate synthetic label material and adhesive, then test it on the actual bottle.
What is the difference between sticker paper and printable vinyl?
Sticker paper usually has a paper face, while printable vinyl uses a synthetic film face. Paper is often suitable for indoor crafts and packaging seals; printable vinyl is generally better suited to applications requiring flexibility and moisture resistance.
Can I order custom sticker paper in bulk?
Yes. Custom sticker orders can be produced in different sizes, shapes, materials, finishes, and packing formats. MOQ and pricing depend on the selected construction, production method, and quantity per design.
What files should I provide for a custom sticker order?
Vector files such as AI, EPS, or print-ready PDF are useful for logos and cutting paths. High-resolution raster artwork may also be suitable. Confirm the required bleed, safe area, dimensions, and color specification with your supplier.
What should I send a manufacturer to get a quote?
Provide the sticker size, artwork, material, quantity, shape, finish, adhesive requirements, application surface, environment, and packing format. For specialized labels, include any required durability or compliance tests.
Final Recommendation: Choose Sticker Paper Based on the Job
Learning how to use sticker paper is not just about printing and peeling. The best results come from choosing a compatible material, preparing the artwork correctly, setting up the printer, allowing the print to dry, cutting accurately, and applying the sticker to a clean and suitable surface.
For home crafts and short-term indoor use, basic paper sticker sheets are often sufficient. For product packaging, bottle labels, outdoor stickers, and demanding industrial applications, the material and adhesive need more careful consideration.
As a custom label manufacturer, we help B2B buyers evaluate these factors before production. Whether you need paper stickers for packaging, film labels for bottles, custom die-cut stickers, or an OEM/ODM label solution, our recommendation is the same: define the application first, test the complete construction, and approve the specification before committing to bulk production.
To discuss your project, send us your artwork, dimensions, quantity, preferred material, application surface, and destination market. We can review the requirements and help you identify a practical customization and quotation route.

Jgs is a custom labeling professional with 15 years of industry experience in labeling solutions.