How to Make Stickers Without Sticker Paper
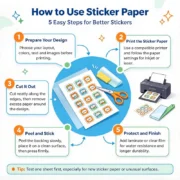
Making stickers does not always require specialized sticker paper. If you want to decorate a notebook, journal, gift box, phone case, folder, or craft project, you can make simple stickers using ordinary paper, clear packing tape, scissors, and wax paper or parchment paper.
The most practical no-sticker-paper method is a packing-tape sticker. The design is placed between layers of transparent tape, while wax or parchment paper acts as a temporary release backing. This creates a flexible, glossy sticker-like piece without buying adhesive sticker sheets. Craft guides from Crayola and other DIY sources essentially use this tape-and-release-paper approach.
However, homemade stickers and commercially manufactured sticker-paper labels are not equivalent. DIY tape stickers are excellent for small quantities, crafts, testing designs, and personal projects. Sticker paper is generally better when you need predictable adhesion, clean production, professional appearance, or larger quantities.
Can You Make Stickers Without Sticker Paper?
Yes. The simplest method uses regular paper + clear packing tape + wax/parchment paper.
The basic structure is:
Clear tape → printed or hand-drawn design → clear tape → release backing
The tape protects the artwork and creates the outer surface, while the release paper allows the finished sticker to be stored and peeled later.
A typical DIY sticker can be completed in roughly 5–20 minutes, depending on the number, size, and complexity of the designs. Recent DIY guides describe the basic taped method as taking only a few minutes once the artwork is ready.
The method is inexpensive because it uses materials that many households already have.
What You Need
For a basic batch of homemade stickers, prepare:
- Plain printer or copy paper
- Clear packing tape
- Wax paper or parchment paper
- Scissors or a craft knife
- Pencil and markers, or a printer
- Ruler or plastic card
- Optional: double-sided tape
- Optional: colored pencils
- Optional: cutting machine
For beginners, clear packing tape around 48–75 mm wide is convenient because it provides enough surface area for small stickers. If the tape is narrower than the artwork, several strips can be overlapped slightly.
One important distinction: the backing paper must allow the adhesive to release. Crayola’s DIY method specifically places packing tape on wax paper before adding the artwork and another tape layer.
How to Make Stickers Without Sticker Paper Step by Step
Step 1: Create Your Sticker Design
Start with a simple illustration, logo, cartoon, lettering, photograph, or graphic.
You can draw directly on ordinary paper or print the design using a home printer.
For the easiest cutting process, leave a border around the artwork. A 2–5 mm border is a useful practical starting point for small handmade stickers, although the ideal border depends on the design.
If your artwork contains very small text or extremely thin lines, test one sticker first. Homemade tape construction can visually soften very fine details compared with professionally printed label stock.
Step 2: Cut the Artwork
Cut around each design, leaving a small amount of surrounding paper.
Do not cut directly against every tiny detail at this stage. A simple outline is faster and makes it easier to seal the design between the tape layers.
For example, if you are making a 50 mm cartoon sticker, leaving approximately 2–4 mm around the artwork can make the final piece easier to handle.
Step 3: Prepare the Release Backing
Place a sheet of wax paper or suitable parchment paper on a flat work surface.
Place a strip of clear packing tape onto the release paper.
The important point is that the tape should be positioned so its adhesive side contacts the release backing. This creates the peelable base of the sticker.
Crayola’s published DIY method follows this basic construction: tape is placed on wax paper, the design is placed on the tape, and another strip of tape covers the design.
Step 4: Place the Artwork on the Tape
Put your cut design onto the exposed adhesive surface.
Press the paper down gently.
Work from the center toward the edges to reduce air pockets. Use a ruler, bank card, or plastic scraper to smooth the surface.
Avoid pressing too aggressively because excessive pressure can distort lightweight paper.
Step 5: Add the Top Tape Layer
Place another piece of clear packing tape over the entire design.
The top tape should extend slightly beyond the artwork on all sides.
This creates a sealed sandwich:
Top tape → artwork → bottom tape → release paper
Press the top layer firmly but smoothly.
Check the edges carefully. If the artwork extends beyond the tape, it may not be fully protected.
Step 6: Remove Air Bubbles
Small bubbles do not necessarily make the sticker unusable, but they reduce the visual quality.
Use a plastic card to gently push bubbles toward the edge.
For a professional-looking result, work slowly from one side to the other instead of pressing the entire surface at once.
Step 7: Cut the Finished Sticker
Cut around the sticker while leaving a small sealed border.
This border is important because the two tape layers need to remain connected around the artwork.
A practical starting point is a 2–5 mm transparent border.
For complex shapes, rounded corners are usually easier to cut and less likely to create sharp lifting points.
Step 8: Peel and Apply
When you are ready to use the sticker, peel the completed piece away from the wax or parchment backing.
Apply it to a clean, dry, smooth surface.
Press from the center outward and hold the sticker down firmly for several seconds.
The result should be a thin, transparent, glossy, homemade sticker.
What Results Can You Expect?
A properly made packing-tape sticker can have several useful characteristics:
| Feature | Typical DIY Result |
|---|---|
| Appearance | Glossy and transparent |
| Thickness | Thin to medium |
| Water resistance | Good on the tape-covered surface |
| Adhesion | Moderate and dependent on tape |
| Shape | Fully customizable |
| Printing | Depends on printer/paper |
| Production speed | Good for small batches |
| Durability | Suitable for light-duty use |
| Professional appearance | Moderate |
| Large-scale production | Not practical |
The most noticeable advantage is the glossy protective surface. The clear tape effectively acts as a protective layer over the artwork.
Some DIY methods describe the finished tape construction as waterproof or water-resistant. However, this should not be interpreted as equivalent to a professionally engineered waterproof label. Performance depends on the tape, paper, sealing quality, edges, and application surface.
How to Make Stickers Without Sticker Paper and Without a Printer
You can also make stickers completely by hand.
Draw the design using markers, colored pencils, or pens on ordinary paper.
Then follow the same tape method:
- Draw the design.
- Cut it out.
- Put packing tape on release paper.
- Place the design onto the tape.
- Cover it with another tape layer.
- Smooth the surface.
- Cut around the design.
- Peel the backing.
- Apply the sticker.
This method is particularly useful for children’s crafts, journaling, handmade cards, classroom activities, and personalized gifts.
How to Make Waterproof-Style Stickers Without Sticker Paper
The packing-tape method can provide a water-resistant outer surface because clear tape covers the paper.
However, the weakest points are usually the edges and adhesive layer.
If water reaches the paper through an unsealed edge, the paper can absorb moisture. Therefore, make sure the tape layers overlap around the entire artwork.
For a water bottle, outdoor equipment, automotive surface, or product packaging, DIY tape stickers should be treated as a temporary craft solution rather than a guaranteed outdoor label.
For products exposed to UV light, rain, chemicals, abrasion, or frequent washing, professionally manufactured synthetic or vinyl labels are generally a better choice.
How Much Do DIY Stickers Cost?
DIY stickers can be very inexpensive, especially when the materials are already available.
For example, suppose you already have paper and scissors and only need packing tape and release paper. A small batch may cost only a few dollars in consumables.
The real cost is labor.
Imagine making 50 stickers and spending an average of 2 minutes per sticker:
50 × 2 minutes = 100 minutes
That is approximately 1 hour and 40 minutes of manual work.
For 100 stickers at the same rate:
100 × 2 minutes = 200 minutes
That is more than 3 hours.
These are practical time estimates rather than fixed production standards. Actual time depends heavily on sticker size, artwork complexity, cutting method, and experience.
This is why DIY becomes less attractive as quantities increase.
DIY Stickers vs. Sticker Paper
The biggest difference is the adhesive system.
Sticker paper is manufactured with an integrated adhesive layer and release liner. The user prints directly onto the printable surface, cuts the design, and peels it from the backing.
The DIY tape method creates the sticker through an additional construction process.
| Factor | DIY Without Sticker Paper | Sticker Paper |
| Initial material cost | Very low | Higher |
| Preparation | More manual | Simple |
| Adhesive consistency | Variable | More consistent |
| Surface finish | Usually glossy | Matte, gloss, clear, textured options |
| Waterproof options | Limited | Many professional options |
| Cutting | Manual or machine | Manual or machine |
| Small DIY projects | Excellent | Excellent |
| 100+ pieces | Labor intensive | More efficient |
| Commercial packaging | Usually unsuitable | Suitable with correct specification |
| Branding | Basic | Professional |
| Repeat production | Difficult | Easier |
| Industrial applications | Not recommended | Available |
Sticker paper is designed specifically for label production, while the tape method is essentially a clever craft workaround.
When Should You Use DIY Stickers?
DIY stickers are ideal when you need:
- 1–20 stickers
- Personal artwork
- Journal decoration
- School projects
- Children’s crafts
- Temporary decoration
- Handmade gifts
- Design testing
- Prototype samples
They are particularly useful when you want to test a design before investing in professional printing.
For example, a small business could create 5–10 handmade prototypes, apply them to the intended packaging, and evaluate the size and appearance before ordering hundreds or thousands of finished labels.
When Is Sticker Paper the Better Choice?
Use sticker paper when you need:
- Professional packaging
- Consistent adhesive performance
- Large quantities
- Clean die-cutting
- Repeat orders
- Barcode or QR-code labels
- Product identification
- Retail packaging
- Premium branding
- More predictable durability
For commercial products, the label should be selected according to the actual environment.
A refrigerated food package, for example, may require a different adhesive and face material from a dry indoor product. Similarly, automotive labels, outdoor labels, cosmetic packaging, and electronic product labels may require completely different constructions.
How Professional Custom Sticker Manufacturing Works
For businesses that need hundreds, thousands, or millions of stickers, a professional manufacturer can engineer the label around the application.
The process generally includes:
1. Artwork Preparation
The manufacturer checks dimensions, colors, bleed, fonts, and cutting lines.
2. Material Selection
The label face material, adhesive, and release liner are selected according to the application.
3. Printing
The artwork is printed using an appropriate commercial printing process.
4. Finishing
Depending on the product, options can include:
- Matte coating
- Gloss coating
- Lamination
- Hot stamping
- Embossing
- Metallic effects
- Transparent effects
5. Die Cutting
The stickers are cut into the required shape while keeping the release liner intact.
6. Quality Inspection
Professional production can check color consistency, dimensions, printing quality, cutting accuracy, adhesive performance, and packaging.
This approach is much more scalable than manually constructing every sticker from tape.
Can DIY Stickers Replace Commercial Sticker Paper?
For crafts: yes.
For prototypes: yes.
For personal decoration: yes.
For professional product labels: usually no.
The key difference is not simply appearance. It is repeatability and performance.
A handmade sticker may look excellent on a notebook but behave differently when exposed to refrigeration, humidity, abrasion, sunlight, chemicals, or repeated handling.
Commercial sticker materials allow manufacturers to select the face stock and adhesive according to those conditions.
Final Verdict: Which Method Should You Choose?
If you need a few creative stickers immediately and do not have sticker paper, ordinary paper + clear packing tape + wax/parchment release paper is one of the easiest solutions.
The process is simple:
Design → Print or Draw → Cut → Tape → Seal → Cut → Peel → Apply
The finished sticker can be glossy, flexible, visually attractive, and reasonably resistant to light moisture.
But if your goal is to sell products, label packaging, build a brand, or manufacture hundreds or thousands of stickers, dedicated sticker paper or professionally engineered label materials are the better choice.
The DIY method solves the problem of “I need a sticker right now.”
Professional sticker manufacturing solves the much bigger problem of “I need thousands of stickers that look and perform the same every time.”
That distinction is important. A clever kitchen-table hack can be perfect for Saturday afternoon crafts—but it probably should not be responsible for Monday morning’s entire product shipment.

Perfect Label is a professional custom label factory with 25 years of industry experience in label solutions.